In this post we will tell you how you can create a slideshow using CapCut application.
A slideshow is a presentation that uses images and a video on a big screen. Slideshows have been used for a long time and are still the most popular way to present graphics and data.
Slideshows can be used for various purpose such as creating a video, reel, presentation etc. Using CapCut, a free online video editor, has made creating a picture video slideshow very simple.
Today, we’ll demonstrate how to use CapCut to its full potential, which is a helpful tool for making video slideshows.
Why to use CapCut for making Video Slideshows?
You may need to create a slideshow for various purposes such as for educational requirement, social media, advertisement and marketing etc. Whatever may be the purpose, CapCut application will help you create wonderful looking slideshows. We will look at the benefits of making slideshow using CapCut app from below:
Combine your favorite images
When celebrating a memorable event, you may compile a collection of photographs into a slideshow and play it for your friends and family to enjoy. When they see the performance, the audience remembers those memorable times. You may make slideshows for birthdays, Christmas, weddings, and other occasions.
Social Media Sharing
You may either play the slideshows at events or share them privately on social networking sites like TikTok and Instagram after producing them with photographs and great music. On social media walls, very few of them do so. You may post the music-accompanied photo slideshow to TikTok or the TikTok ad manager all at once with CapCut’s free slideshow builder.
Better Engagement and Online Presence
The greatest place to share slideshows is on social media. You may have many friends and family members view it at once. On the virtual platform, you may connect with your friends and have fun. You may use CapCut to overlay text and filters on top of the slideshow to increase audience engagement.
How to Create a Slideshow with CapCut? Step By Step Guide
Now that we have seen the advantages of making a slideshow, let us explore how to create one using CapCut application. Read here to know more about latest features of CapCut.
You’ve certainly seen impressive slide displays on large buildings or in the streets, and you’re inquisitive about how they were made. Before you fully understand how to proceed, it could seem like a difficult undertaking. Therefore we will show you the process of creating one using CapCut’s photo and video compilation tool.
Download CapCut and Launch New Project
You can use CapCut for free which will provide you access to fantastic features. It is accessible for Android and iOS as well as both Windows and macOS. Download CapCut app for the device which you are going to use.
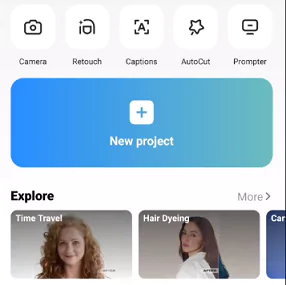
Launch it after downloading, then follow the instructions to make a slideshow. Click New project to begin your slideshow project. By doing this, the video editor will open, allowing you to begin including media, effects, transitions, and other elements. Additionally, if you are a newbie, there are certain crucial pointers to remember while creating quality video cuts.
Add the images, video and music to the slideshow
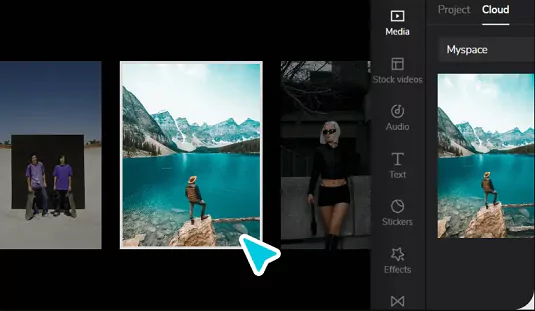
You have two options for adding pictures to your timeline: drag and drop or uploading pictures from your device. Consider uploading numerous files at once to save time rather than posting individual photographs.
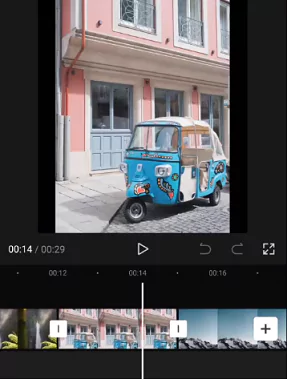
You will organize all of your material, effects, and transitions, among other things, on your timeline in CapCut, which is the bottom panel, to make the slideshow. Hover over the desired material in the material tab and click the + symbol in the bottom right corner to add a picture or video to it.
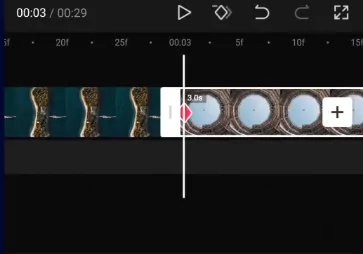
You may now drag the margins of the picture or video to change its length once it has shown in the timeline. You may silence material you’re adding by clicking the speaker symbol on the left if it’s a video, which almost certainly contains sound.
You may also just drag and drop media into the timeline to add it there. Drag the movies and photos to a different location in the timeline to reorder them.
Create an excellent presentation by adding as many photographs and movies as you like and adjusting the durations.
Prepare the images for the slideshow
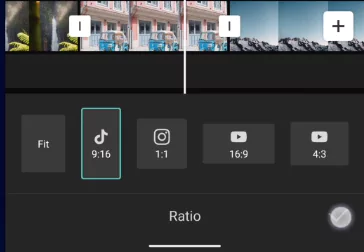
Once you have imported your media, arrange them in order that you want them to appear in your slideshow. You may need to trim or crop your photos and videos to fit the screen. Modify the aspect ratio to your requirement such as using a ratio of 9×16. This is usually used for YouTube shorts, TikTok or Instagram reels.
For selecting the right aspect ratio, click on “Ratio” option from the bottom menu. Now you will be presented with various options such as Fit, 9:16, 1:1, 16:9, 4:3 etc. Choose the one which fits your requirement.
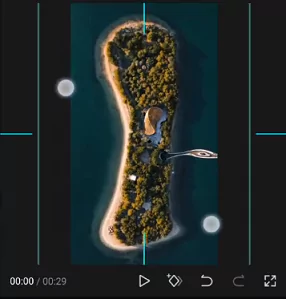
Now, make changes to the size of the photos or videos so that it will cover the entire canvas.
Adding Effects to enhance the slideshow
The next step is to use CapCut’s beautifying tools, such filters, stickers, and texts, to make your film aesthetically appealing. To give the photographs a good, polished touch, you may also add background music and don’t forget to add transitions between the images. You may alter the backdrop of your slideshow by using the video background remover.
You can now apply effects and transitions to liven up your slideshow after organizing your photos and videos. When you select Effects from the menu, the effects should start to appear in the panel below right away. To examine several sorts of effects, expand the selections in the left pane.
For example, you may add zoom effect with the help of keyframes. Simply zoom in each picture and add a keyframe to the start and end of the part of the clip containing each image. This will provide a movement to the pictures showing a slideshow effect.
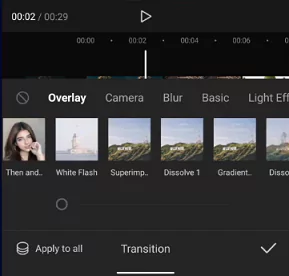
You can add transitions similarly. Click on the white bar in between each image in order to open Transitions tab. Here you have options for effects such as Overlays, Blur, Light Effects etc. Experiment with each transition and apply the one which you feel will fit for your situation.
Adding Music and Audio Effects
Next you can proceed to add music or different sound effects to make the slideshow more interesting. You may drag and drop the music file to the timeline, as you can with the other media, or click the add audio symbol below the timeline. You can also include music in your slideshow by selecting Audio from the bottom menu (or the top menu if you are using CapCut on a PC).
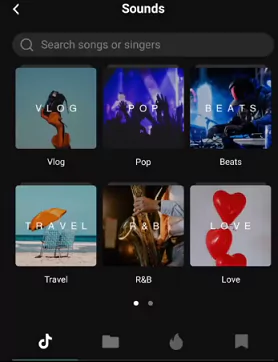
Then, select the kind of music you wish to include by browsing the various music options. Alternatively you can search from the vast library of sounds available in CapCut app itself.
Alternatively, you can use your own music on CapCut. For this click on the “Extracted” option from bottom menu, click on the audio or music video file from the gallery when prompted. Now click on “Import Sound Only” option. This will add the music and sounds to the timeline.
You can use the beats as the transition point in the slideshow. This way, the music will sync with your slideshow.
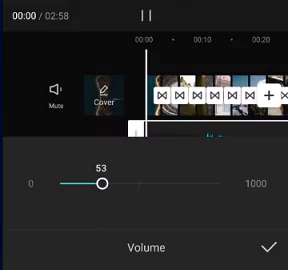
You can modify the volume at various points to suit the requirement of the slideshow. For this, just click on “Volume” option from the menu and modify the volume to suit your needs.
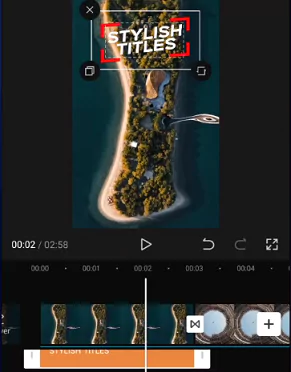
Adding Text using Text Templates
Once you have added the music, you can also add text using Text templates.
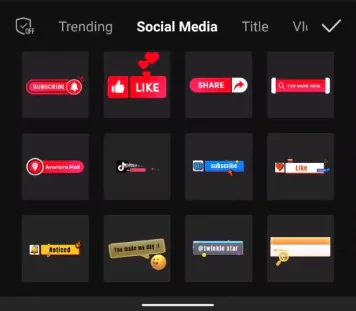
- Click on Text option from the menu. You will be shown options such as Add Text, Stickers, Auto Caption, Text Template etc.
- Click on Text Templates and you will be shown with a lot of options to choose from
- Choose the style and design you want and insert into the slideshow
- Position the text portion on the image in order to align properly and type in the text you require to be shown
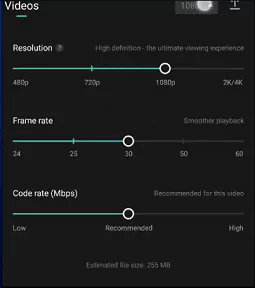
Exporting and Sharing the Slideshow
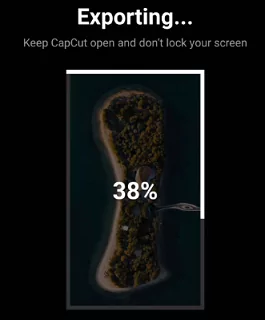
When you’re finished, click Play in the preview window to see how your slideshow will look like. Click Export option present in the top when you are finished. Select the resolution, format, and frame rate of the slideshow before giving it a title.
Once finished, CapCut will generate the output and store it in your Gallery or media folder. From there, you may recover it and share it with your loved ones and on social media.
Watch this below wonderful tutorial made by an YouTube user:

Advantages of using CapCut for Making Slideshows
There is no doubt that there is a range of video editing software available today for making a slideshow. However, CapCut is our preferred option due to a variety of reasons as listed below:
- CapCut is compatible with a wide range of devices, including PCs and mobile. You have the option of using this program offline by downloading it for Windows or using it online.
- CapCut is a free software (although CapCut PRO option is available for paid users). It has a number of features and options found nowhere else which makes it stand out.
- The CapCut video editor is pretty simple to use, as we have already shown in the previous section. Making a slideshow involves a few very straightforward and basic procedures.
- You may quickly share your slideshow with your network by simply tying your account to your social media accounts. You may discreetly share clips with your loved ones or friends.
What is the need to create a video Slideshow?
Slideshows have grown in popularity, and many people now offer them as gifts to loved ones on occasions like birthdays, marriages, and graduations etc. It can also be used for education such as in schools or colleges. Let’s talk about a few benefits of creating slideshows.
- Slideshows are collections of pictures that feature recollections of earlier occasions. You may present those priceless recollections to your loved ones as a slideshow on a single reel. To make it more emotional, add music.
- To make a unique slideshow, you may add your own photos using CapCut.
- A slideshow is one approach to summarize everything about your company using photos and subtitles, which can be done effortlessly with CapCut. If you are a businessperson trying to advertise and promote your company.
- Slideshows have enticing visuals and are easy on the eyes. They serve as ornamental elements in hotels, offices, houses, billboards on the street, and other locations.
Frequently Asked Questions about creating slideshows using CapCut
We have collated some of the frequently asked questions regarding slideshow creation.
Is it possible to create slideshow using TikTok?
Users may create a slideshow directly on TikTok because it is a video editor in addition to being a famous social media platform. You must first log in and create an account before you can record the video or choose the photos you want to include in the slideshow.
Later, you should add text, background music, sound effects, filters, effects, and transitions to the slideshow. Finally, use current hashtags and descriptions when posting it.
However, you might want an application designed for creating and editing slideshows if you want to make your presentation more interesting and polished-looking.
Because CapCut includes a vast collection of materials and effective yet simple-to-use slideshow editing features including a cropper, splitter, converter, resizer, compressor, effect render, and more, we strongly advise you to give it a try. The best part is that CapCut is among the top watermark-free free slideshow makers.
Can we create a photo montage using CapCut?
Creating a slideshow module in CapCut will allow you to create a picture montage. A photo montage is a single slide that contains groups of noteworthy photos. CapCut satisfies the requirements to exactly make a photo montage, despite the difficulty of customizing the images to fit inside the desired frame.
CapCut offers enough templates and frames for you to add your own customized graphics. Using the ready-to-use components, you can easily make the picture montage.
What are the features of CapCut Slideshows?
Below are some of the main features of CapCut slideshow maker
Vast collection of slideshow templates
The finest free slideshow builder has a big collection of readily available free slideshow designs to save time. Additionally, CapCut offers top-notch picture slideshow templates in a variety of shapes and sizes that are ideal for your theme.
It enables you to make your slideshow more appealing and add fancy ideas to it with animated text and already generated background music. Regarding template categories, there are a variety of options, including wedding, Christmas, and other slideshows. You have access to everything.
Ability to add background music
CapCut offers you more than 5,000 different types of royalty-free audio assets along with music. When you include music tracks in addition to your catchy clicks, the audience is exposed to the entire presentation.
A slideshow is completed by blending with appropriate music that moves together with the visuals. Select the appropriate type of music to go with the photographs if you are included them according to a theme.
You may customize the soundtrack’s volume, speed, tone, and other aspects, as well as make it synchronous, using the picture slideshow creator with music.
Options to include title and captions
By giving your slideshows the ideal title and caption, you can make them relevant. Your clippings will be more entertaining if you give the pictures nicknames.
It thrills the audience, and you may create the greatest moments by observing their responses. You may make the slideshow more vibrant and interesting by using animated subtitles.
By giving the program the proper title, you may spread your message to people you don’t even know. An AI Auto-caption tool is also included in CapCut’s slideshow maker.
How to automate using CapCut Slideshow templates?
Now you can use the in-built slideshow templates to create slideshows in a breeze. Just follow these steps:
- Start by selecting a ready-made slideshow template from the online template library. As an alternative, you may touch the “Add” button to begin a new project and add pictures to the slideshow.
- Next, select how many photographs you want to upload. Now press “Audio” to add the preferred soundtrack to the slideshow.
- You may also pick your soundtrack by navigating to the local directories. For both personal and commercial usage, all of the audio materials are royalty-free.
- To make your content more professional, try using text and transitions. Select the uploading options and hit the up arrow button at the top to export the produced slideshow.
- Finally, press “Export“. The project’s advanced settings, such as resolution, quality, and so on, may be set.
Final Thoughts
One of the greatest free slide show creators is the CapCut video editor. It is a dependable tool with incredible built-in functions. The finest free slideshow creator must offer a wide range of customization choices for the images.
The presentation should have an impressive overall result and provide the desired effects to the audience. Users are satisfied with the CapCut’s amazing edits since they meet their demands and have a user-friendly interface.
To make your slide displays more engaging, try out and explore CapCut further. Your only creative constraint with CapCut’s tools is your own limitations.