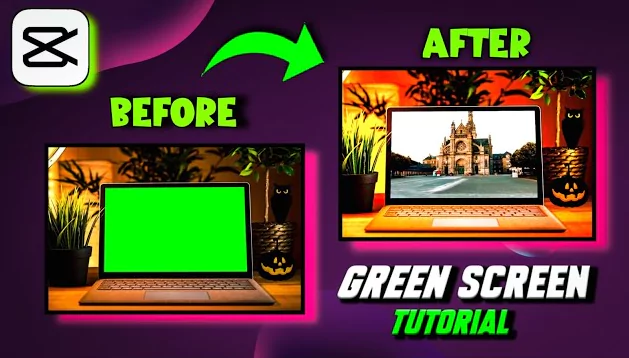
You’re about to learn how to perform green screen editing on CapCut in a simple manner. This feature is a great video editing talent. Follow the step-by-step instructions.
Recently, green screens have become ubiquitous in video editing. You’ll ultimately see some of these adjustments on social media if you read through the feed for a while. It may be ads in a YouTube video, complex effects made with moving objects, or a joke embedded in a selfie video.
Green screen is a technique used in video editing that makes it simpler to modify the backdrop of a film or let an animated figure move on it. It’s frequently used in TV shows, movies and other video productions. We’ll also discuss green screen processing on mobile devices in this post.
- Why use Capcut for Green Screen?
- How to do Green Screen using CapCut Chroma Key
- How to do Green Screen using Background Removal Tool
- Guide to edit videos using Green Screen
- Common Questions about using Green Screen on CapCut
- What is Capcut video editor?
- What is the technique of Green Screen video editing?
- How to obtain green screen video?
- Can we remove Background in Capcut?
- How Can the Green Screen Background in CapCut Be Modified?
- Can I Remove the Background without Green Screen?
- What is the process to add moving object on screen?
- What is Chroma Key effect?
- How to add picture on top of a green screen?
- Additional Background Removal Tips
- Summary
Why use Capcut for Green Screen?
The newest video editing software from Bytedance is called Capcut. This is same the company behind TikTok which has managed to dominate the US app store charts. CapCut deserves your attention if you’ve been looking for a solid mobile video editing tool. Read the reviews.
You may utilize a variety of effects and filters to personalize and improve your films, and it features a simple user interface.
On CapCut, you can also utilize a green screen and remove background using the editor. If you’ve been interested in doing the same, then here is how you can get started.
On both Android and iOS smartphones, CapCut is a free all-in-one video editing tool. Because CapCut is TikTok’s default video editor and offers a tonne of fun video editing tools, it has become incredibly popular all around the world.
One of these features that stands out is the green screen video editing, which lets you use the CapCut app on your smartphone to modify the background of videos.
There are wonderful video editing skills which you can learn by using CapCut such as overlays, zoom in, 3D zoom, velocity edit, slow-mo etc.
How to do Green Screen using CapCut Chroma Key
Download the CapCut app before beginning the instruction.
Although utilizing green screen films in your edits requires some preparation, the CapCut Chroma function makes adding green screen overlays a snap.
Step 1: Make the green screen video ready
- You might wish to utilize the green screen on an unprocessed video even when you’ve previously finished an edit somewhere without it.
- Grab the green screen video online or record it yourself (more on this below).
- In any case, be careful to export the movie to your camera roll. It’s much better if you created the complete video cut with CapCut because it’s already been imported.
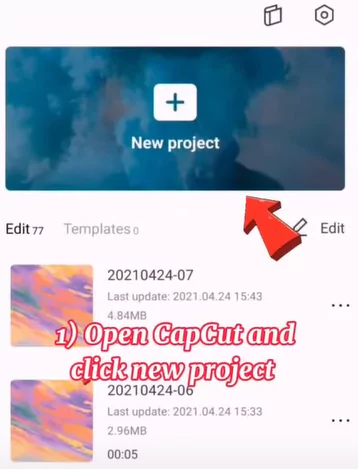
- Click “New project” and pick a video to serve as your background. Alternately, you may choose a backdrop made up of many video segments. Then press “Add.”
Step 2: Overlay the Green Screen on top of Existing video
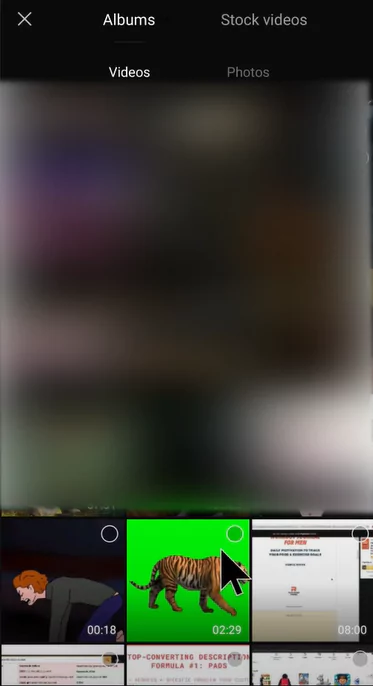
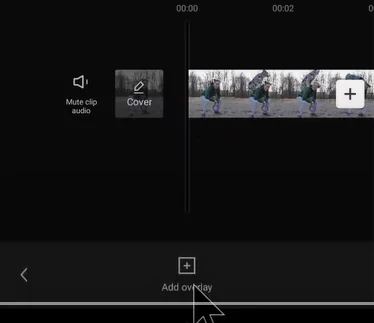
- Select Overlay > Add overlay from the options at the bottom as you scroll down.
- In your camera roll, find the green screen overlay, choose it, and hit Add. It will be imported into the main editing window as a distinct clip.
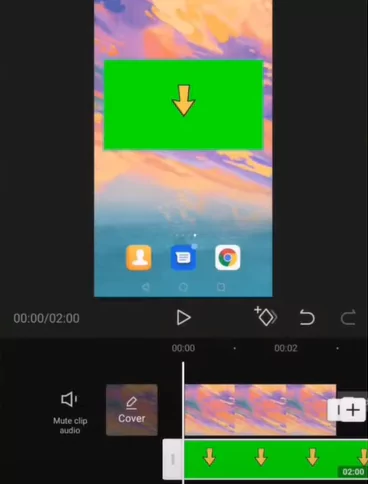
- To choose the clip with the overlay, tap on it. Drag it now to the desired location in the replay frame. To alter the size, pinch with two fingers.
- Find the picture’s trim controls at the start and finish (represented by white bars) while the overlay is still chosen, and adjust the playing duration as necessary.
Step 3: Removing the Background
- Scroll the options at the bottom while tapping the green screen video.
- Locate and touch the “Chroma key” button. The color selector will appear.
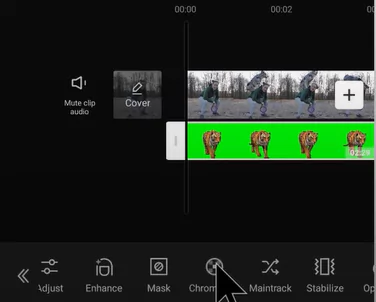
- Then, choose the color green or any other colors you want to be eliminated.
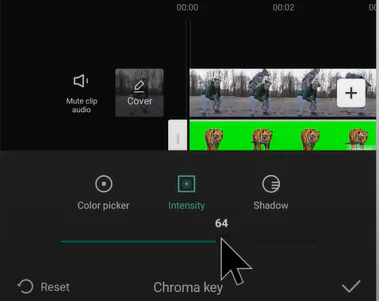
- Press “Intensity” once. A slider will then appear at the bottom.
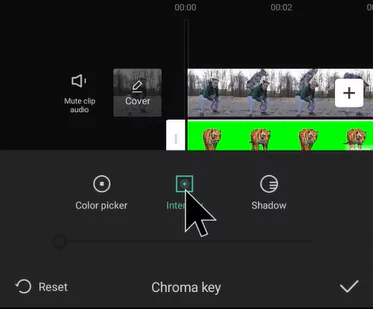
- Move the slider up and down until the chosen color is gone.
- The subject’s lighting may occasionally be different from the background’s illumination.
- To change the amount of shadows, touch on “Shadow” in this instance.
You’re now ready to go! You might wish to change the overlay’s subject once again now that the background has been eliminated. To choose the overlay clip, just tap it. Then, using your finger, move it onto the playback frame.
Step 4: Finishing and Exporting your edited video
- You may always check the finished product while editing in the top window.
- When you’re finished and want to save and export your movie, click the export button in the upper-right corner.
- Once completed you can start sharing your green screen videos on your social network sites
Watch the detailed video walkthrough guide from below:
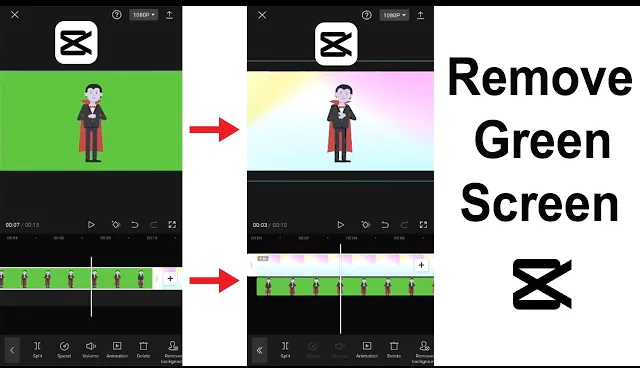
How to do Green Screen using Background Removal Tool
Furthermore, CapCut’s background removal feature allows you to employ green screen. You may quickly remove the backdrop from your video with the background removal function.
However, Android-only smartphones may use the background remover. With the “Background Remover” menu in Capcut’s feature-rich app, you may erase the background of any desired movie in addition to using the chroma key.
The Green screen from the video will be instantly removed thanks to this function.
Step 1: Download and Open the Capcut App on your Phone
- Open CapCut on your phone, choose + New Project, add your videos by tapping on Add, and then press on Launch.
Step 2: Add Background Clip as Overlay
- Tap Overlay in the bottom-left corner.
- If you give access, it could ask for your permission to view the gallery.
- Once you’ve chosen the films you want to use, hit “Add” to jump into the editing panel.
- Choose the “Overlay” menu from the list of menus that appears at the bottom.
- To remove the green backdrop from the selected green screen movie, pick it now.
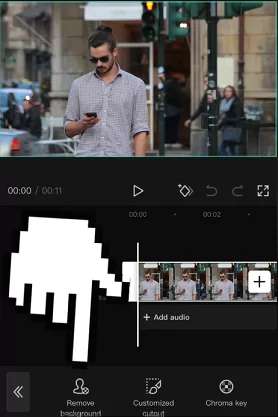
Step 3: Using the Remove Background Tool
- Scroll the tool from the bottom and choose the green screen video from the chronology.
- From the tools bar at the bottom, select Remove Background option.
- Now that you have inserted a green screen movie, the bottom should show general menus.
- You might need to scroll down the menu depending on the size of your screen to find “Remove Background“.
Step 4: Finishing Touch and Exporting
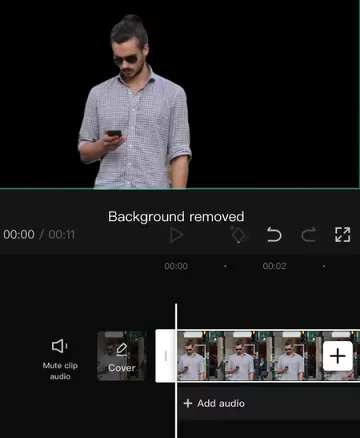
- The green screen backdrop will then be automatically removed from your movie by CapCut.
- Your green screen is currently being eliminated, as you can see.
- The backdrop will be automatically removed; the procedure may take a while.
- However, in the end, the green screen background will be automatically removed.
- If you’d like, do further adjustments before saving the movie for extra social sharing.
That concludes our discussion on green screen on CapCut. You may easily learn how to use the green screen feature on CapCut by simply following the detailed instructions above.
Guide to edit videos using Green Screen
Green screen is the technique used in video editing to replace a specific color (usually green or blue) in a video with another image or video. This allows you to place different backgrounds or elements behind the subject during post-production. Here’s a basic guide on how to use a green screen in video editing while using CapCut application:
Setup
- Set up a green screen backdrop behind your subject. Ensure it’s evenly lit without shadows or wrinkles.
Lighting
- Make sure the green screen is evenly lit to ensure consistent color. Also, light your subject separately to avoid shadows.
Recording
- Film your subject in front of the green screen, making sure they don’t wear clothing that matches the green color.
Import Picture Materials
- Import your footage into a video editing software that supports chroma keying, such as CapCut
Apply Chroma Key Effect
- Keying Effect: Find the chroma key or keying effect in CapCut
- Select Color: Choose the color you want to remove (green in this case).
- Adjust Settings: Tweak settings like tolerance, edge feathering, and spill suppression to refine the key.
Add Background
- Once you’ve keyed out the green, place your desired background behind the subject on the timeline.
Fine-Tune
- Adjust Position: Resize or reposition your subject as needed.
- Color Correction: Make adjustments to match the lighting and color of your subject with the new background.
- Refine Edges: Use masking or feathering tools to refine the edges and make the composite look more natural.
Preview
- Preview Your Video: Play your video to ensure the subject seamlessly integrates with the new background.
Export
- Export Your Video: Once satisfied, export your final video with the green screen effect.
The success of your green screen effect with CapCut depends on careful setup during filming and precise adjustments during editing. Practice and experimentation will help you master the technique for CapCut application.
Common Questions about using Green Screen on CapCut
People frequently have questions on using the green screen feature. Therefore, we have listed down some of the them below:
What is Capcut video editor?
On both Android and iOS smartphones, CapCut is a free all-in-one video editing tool. Because CapCut is TikTok’s default video editor and offers a ton of fun video editing tools, it has become incredibly popular all around the world.
One of these features that stands out is the green screen video editing, which lets you use the CapCut app on your smartphone to modify the backdrop of videos.
What is the technique of Green Screen video editing?
The phrase “green screen” is used in film and video editing processes like chroma key. With the use of the green screen technology, film producers can modify or add the backdrop of a moving item.
On the other hand, adjusting the video background is a very common filmmaking technique that is employed in many movie productions.
For instance, an actor may easily portray the heart-wrenching mountain climbing scenario without having to climb on a rock thanks to the assistance of strings and ropes, as well as the green backdrop. The green screen video editing method is responsible for all of them.
How to obtain green screen video?
You can get the green screen videos using online tools such as Pixabay or Pexels. Just follow the below steps:
- Open the relevant link after conducting a Google search for Pixabay or Pexels.
- There are several green screens available on Pixabay. Select one by scrolling through them until you locate it.
- You can require more expert green screens for your own particular tasks.
- You will be led to a page where you may see the green screen movie and determine whether it is satisfactory, etc., after choosing one.
- Click “Free Download” to acquire the green screen if it meets your demands.
Can we remove Background in Capcut?
Yes, you can quickly erase the video backdrop with a few clicks using CapCut’s green screen tool and Chroma Key feature.
How Can the Green Screen Background in CapCut Be Modified?
CapCut’s Chroma Key function is required to alter the backdrop of the green screen. After applying an overlay to the background video, you may change the background of the green screen by boosting the Chroma Key’s intensity.
Can I Remove the Background without Green Screen?
Without a green screen, CapCut’s backdrop cannot be removed. You require either Overlay or Chroma Key, both of which are CapCut features, to eliminate the background from a movie.
What is the process to add moving object on screen?
If you wish to add a floating item to a film, like a virtual character, but don’t want the overlay to cover over the backdrop footage, you’ll need to use a video editing method called green screen. You can quickly include moving objects in films with the help of the free CapCut video editing tool for Android and Mac.
The steps are precisely described in the previous section.
What is Chroma Key effect?
Chroma keying is a visual effects and post-production method for combining two pictures or video streams depending on color background. The news broadcasting, movie, and video game industries have all utilized the method to eliminate a background from the focus of a photo or video.
How to add picture on top of a green screen?
By selecting the eye symbol adjacent to the layer, you may choose the layer that includes the green screen. Then, in Windows Explorer or Finder, find the picture you wish to use as your backdrop, and drag it into Capcut. You may complete the work at hand by simply rearranging the layers such that the background layer is behind the green screen layer.
Watch he video tutorial below:
Additional Background Removal Tips
Regrettably, CapCut only offers you a little amount of flexibility over taking out colors from your videos. The following sliders are available to you.
Intensity
You may modify the intensity with which the colour is stripped from your clip with this slider. In actuality, when you remove the colour, this slider aids you in controlling and dictating the subject’s edges.
This may be really helpful when working with materials like fur, which have a lot of strands and edges. Unfortunately, this doesn’t mean that the intensity slider gives you a lot of control; instead, you have access to a simple slider without any options for adjusting the edges.
However, something is always preferable than nothing.
Shadows
The shadow slider lets you add fake shadow effects to the video’s edges so they appear more realistic, enhancing the outline without the need for outside insertion. The background noise is lessened, or the subject has a different light source than the backdrop.
Choose the Right Color
While green is commonly used, sometimes blue screens are preferred, especially when the subject has green elements (like clothing).
Light Separately
Lighting your subject and the green screen separately helps with better keying results.
Avoid Shadows
Shadows on the green screen can complicate the keying process.
Summary
In conclusion, a green screen enables you to seamlessly transition an item from one film to another by adding it to the new video.
You’ll need to have a green screen clip and a video background to achieve this on CapCut. Once you have it, do the following actions to get the green screen off:
- Use the video backdrop in a new project.
- As an overlay, include the green screen video.
- Select “Chroma Key” from the menu.
- Utilize the “Color Picker” option to choose the colour green.
- Boost the brightness until the green screen is totally gone.
- The green screen backdrop will vanish as you increase the intensity.
We hope that this instruction made it simple for you to understand how to utilize CapCut’s green screen. Please feel free to leave any comments or questions in the space provided below.