Can't see the timel...
 
Notifications
Clear all

Can't see the timeline in transcript option

10 Posts
3 Users
0 Reactions
903 Views
Posts: 1
Topic starter
(@hypufix)
New Member
Joined: 5 months ago

Hello, for about two weeks now, I can no longer see the timeline in the transcript option of Capcut Pro for Mac. This is very annoying because I use it all the time to review footage before starting my video editing. I tried completely uninstalling and reinstalling the software, but it didn't solve the problem. Does anyone have a solution?
Capture d’écran 2026 03 05 à 10.23.17

9 Replies
CapCut Edit
Posts: 1080
Admin
(@admin)
Member
Joined: 2 years ago

Hi,

The timeline preview inside the Transcript panel is missing in CapCut Pro for Mac. This issue has been discussed by other users also recently and is caused by one of three things: a UI layout bug, a disabled transcript feature, or a version glitch. Here are the fixes that should solve it.

Toggle the Transcript Panel Mode

Sometimes CapCut switches the transcript panel to list-only mode, hiding the timeline.

Try this:

  1. Open Transcript panel.

  2. Look for a small icon near the top right (often 3 dots or a layout icon).

  3. Switch between:

    • Transcript

    • Captions

    • Text-based editing

  4. Toggle them once and return to Transcript.

This forces the timeline strip to reappear.

Reset the Workspace Layout

Sometimes the individual modules (like the transcript timeline) get "stuck" in a hidden state within CapCut's configuration.

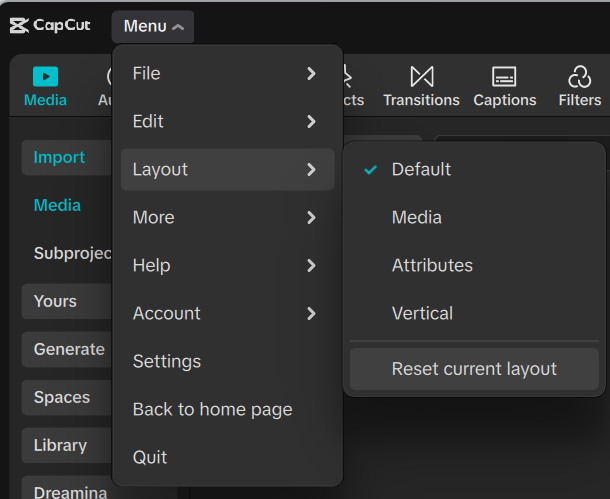
  • Go to the Menu in the top-left corner.

  • Select Layout.

  • Click Reset current layout.

  • Even if your main workspace looks fine, this forces CapCut to redraw every sub-module, including the transcript timeline.

Re-Generate the Transcript

If the transcript was generated before a recent update, the timeline markers can disappear.

Fix:

  1. Delete the existing transcript.

  2. Click Generate Transcript again.

  3. Wait for it to rebuild.

Switch to the Dedicated "Transcript-based editing" Layout

CapCut recently separated the "Remove filler words" popup from a full Transcript-based editing layout. If the popup is glitching, the full layout should still work:

Go to Menu > Layout > Transcript-based editing.

This will change your entire workspace to prioritize the script and timeline side-by-side. This is more stable for reviewing long-form footage than the modal popup.

Downgrade or Update CapCut

Around recent builds, a bug has affected text-based editing timeline previews.

Check for updates:

  • CapCut → Check for Updates

If you are already on the newest version, installing the previous version sometimes restores it.

Clear the "Deep" App Data (macOS)

A standard "Move to Trash" uninstall on Mac often leaves behind the very configuration files that are causing the UI glitch. To do a true clean install:

  • Close CapCut.

  • Open Finder, press Cmd + Shift + G, and paste: ~/Library/Application Support/

  • Locate the CapCut folder and rename it to CapCut_Backup (or delete it if you've synced everything to the cloud).

  • Relaunch CapCut. It will act like a brand-new installation and should force the UI to pull fresh assets.

Hardware Acceleration Check

Since the timeline isn't rendering visual segments, it could be a GPU rendering issue:

  • Go to CapCut > Settings (or Cmd + ,).

  • Under the Performance tab, try toggling "Speed up hardware encoding" or "Speed up hardware decoding" off and then on again.

  • Sometimes a specific macOS update conflicts with CapCut’s hardware acceleration for UI elements.

Quick test:
Create a new project, import a short clip, generate transcript.
If the timeline appears there, the issue is project-specific, not the app.

Let us know how it goes after you follow each of the steps mentioned above. We will help you further.


Reply
Posts: 0
(@Anonymous)
Joined: 1 second ago

Hi, thanks for your response.

For the "Toggle the Transcript Panel Mode" i can't find the little icon that you tell me to use could you add a screen shot?

for the "Reset the Workspace Layout" i can't find the "menu" in top left corner, could you add a screenshot?

for the "Reset the Workspace Layout" how do you delete the existing transcript

and for the "Switch to the Dedicated "Transcript-based editing" Layout" still cant find the menu

thanks for your future reply !


Reply
1 Reply
CapCut Edit
Admin
(@admin)
Joined: 2 years ago

Member
Posts: 1080

CapCut for Mac might not have some of the menu items mentioned earlier.

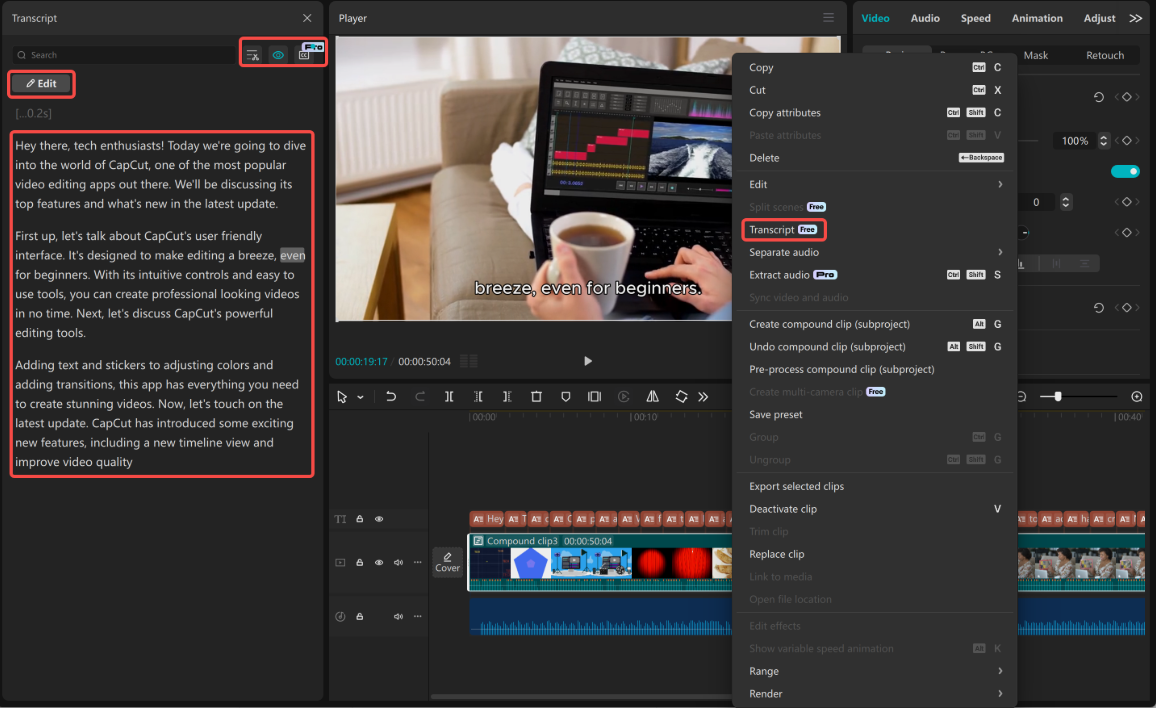
Where the transcript options button is?

In the Transcript panel, the controls are very subtle.

Look in the top-right corner of the Transcript panel for:

··· (three dots icon)

Steps:

  1. Open the Transcript tab.

  2. Move your mouse to the top-right of that panel.

  3. Click the three dots (···).

  4. Toggle:

    • Show timestamps

    • Text-based editing

    • Captions

Sometimes the timeline markers disappear when timestamps are hidden.

image

How to delete and re-generate the transcript?

If the transcript gets corrupted, regenerating it restores the timeline.

Steps:

  1. Open the Transcript panel.

  2. At the top of the transcript list, look for a trash icon 🗑 or "Delete transcript".

  3. Click Delete transcript.

  4. Click Generate transcript again.

CapCut will re-analyze the audio and rebuild the timestamps.

Why the timeline may be missing?

From your screenshot, the transcript lines appear but the timestamp markers are missing on the left.

This happens when:

  • "Show timestamps" is turned off

  • The transcript failed to sync with the clip

Create a test project:

  1. New project

  2. Import any short clip

  3. Select the clip

  4. Click Transcript → Generate

If the timeline appears there, the problem is only in your current project file.

One more thing we noticed in your screenshot:
Your transcript panel shows speaker labels but no timestamp column, which strongly suggests timestamps are disabled or the transcript bugged during generation.

Can you send one more screenshot showing the full CapCut window (especially the top bar of the Transcript panel) and we can point exactly where the button should be on your screen.


Reply
Posts: 3
(@Audrius)
Joined: 1 week ago

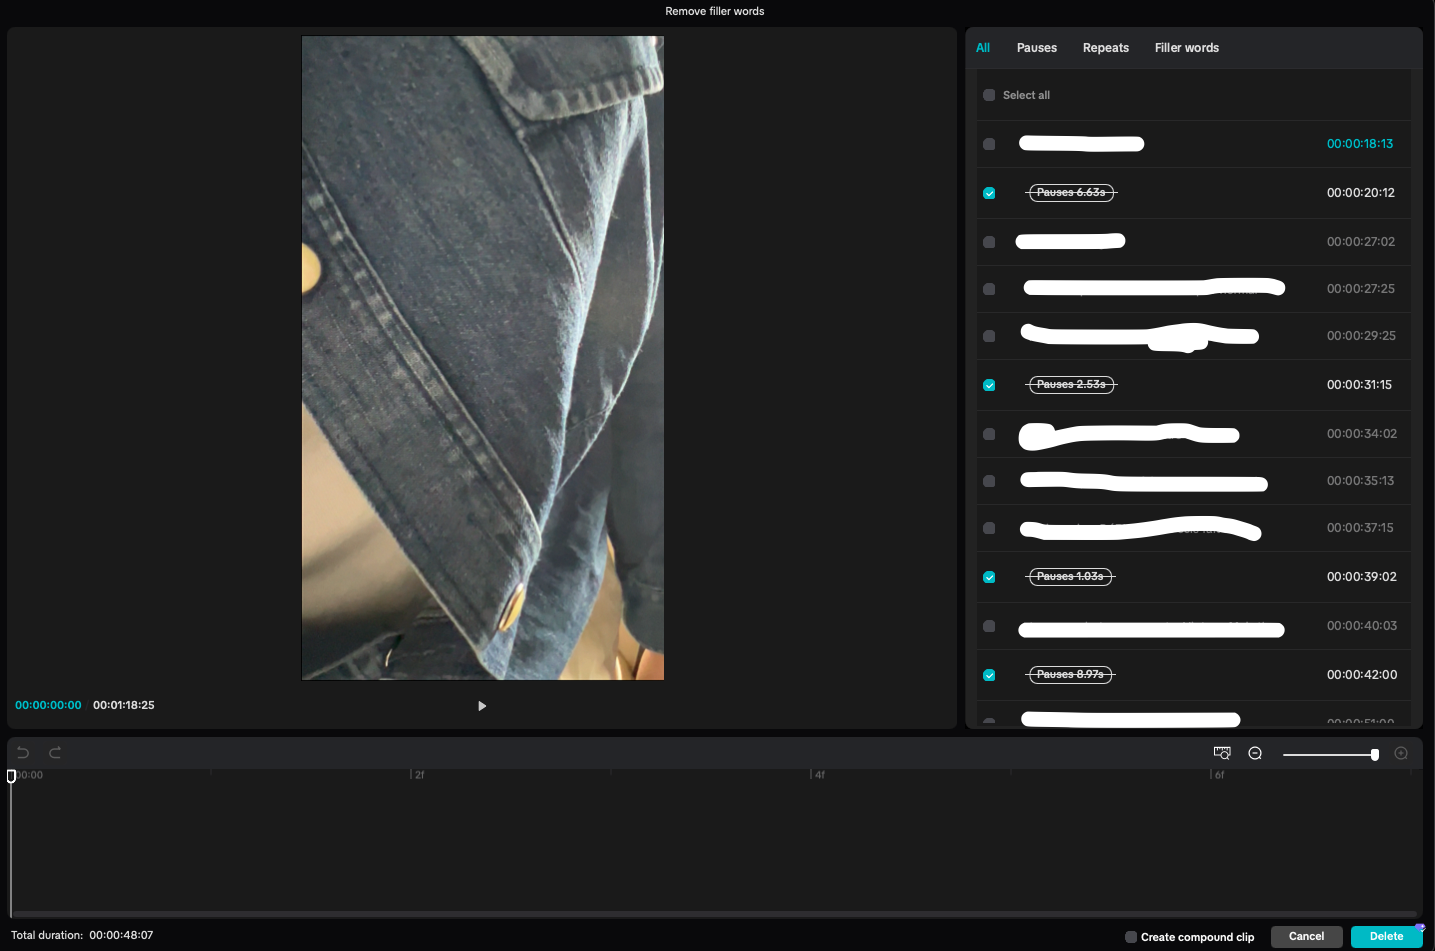
I have exactly the same issue and none of the suggested fixes help - half of them don't even match the actual UI. My version is 8.9.1 on Windows.

I even installed CapCut Desktop on another PC that never had CapCut, created new project, used different media and it still acts the same.

I have actually used this feature maybe half a year ago. It worked back then so I know how it's supposed to look. Now I resubsribed to Pro just for this feature and it's not working.
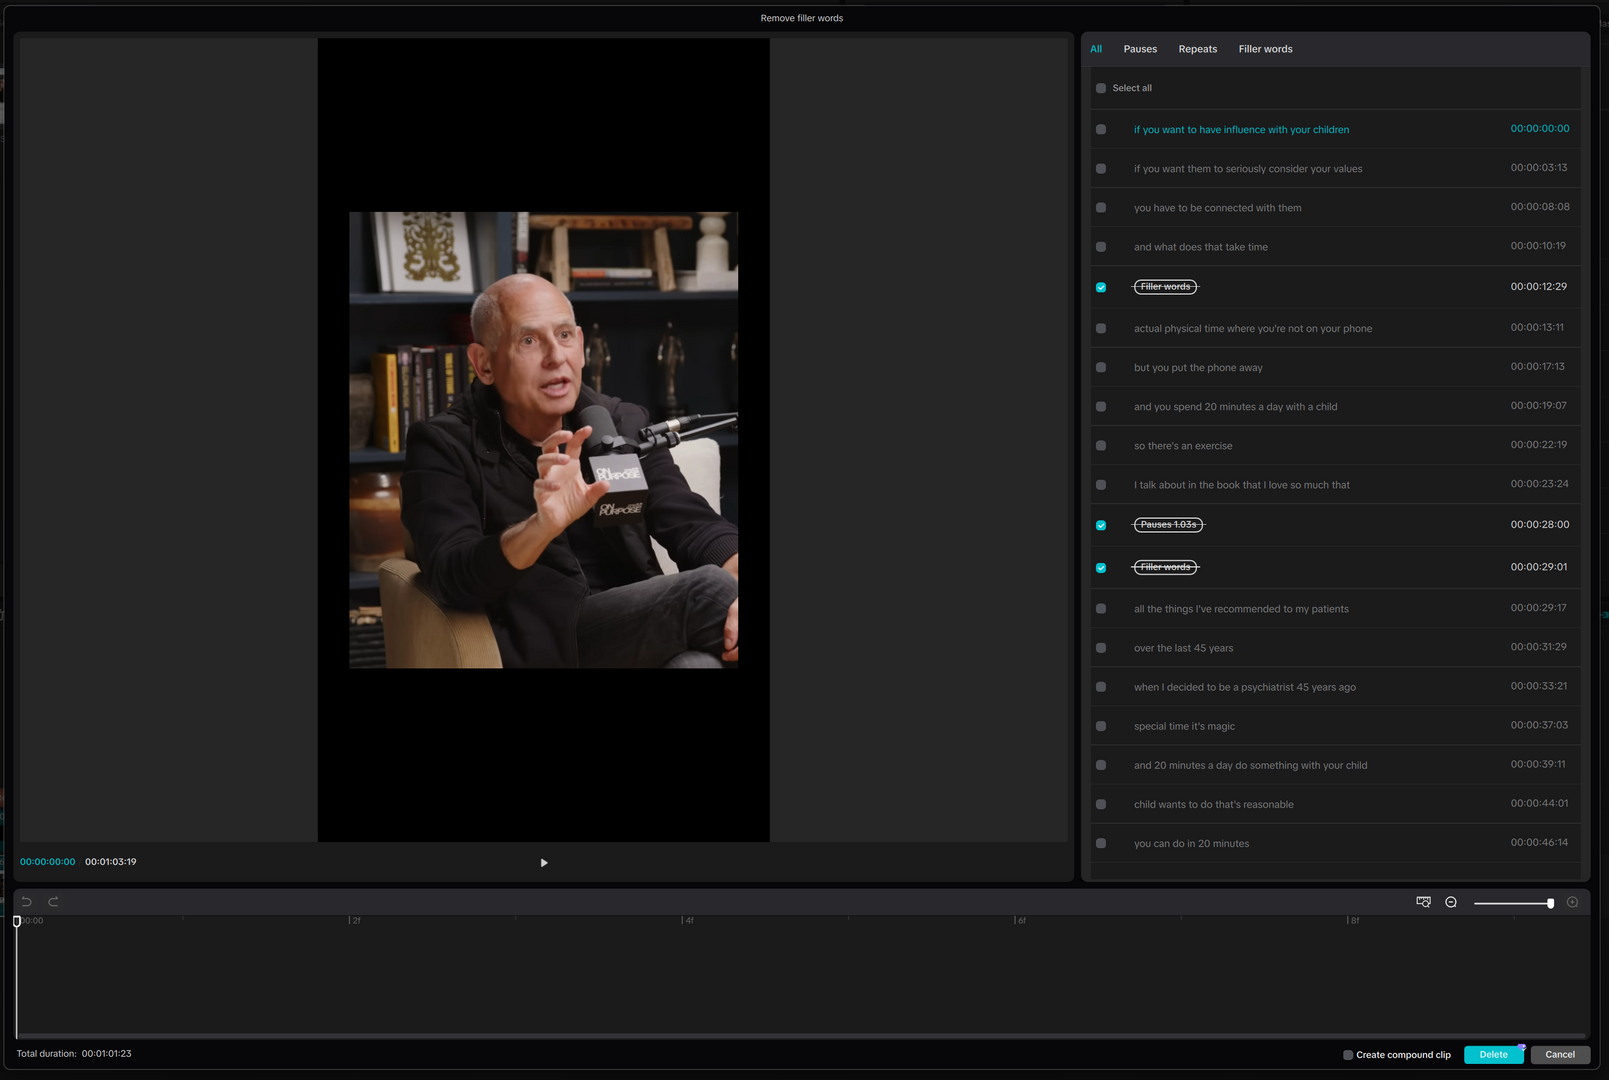
capcut bug2
capcut bug1

Reply
1 Reply
CapCut Edit
Admin
(@admin)
Joined: 2 years ago

Member
Posts: 1080

Hi,

The timeline looks blank inside the "Remove filler words" tool is that your timeline view is fully zoomed in to the frame level (2f, 4f, 6f, 8f).

Because it is showing fractions of a single second, the content of your video is stretched way past your screen, making it look empty.

You can easily fix this by zooming out:

  • Look at the bottom-right corner of the timeline area (just above the blue Delete and Cancel buttons).

  • You will see a zoom slider with a - on the left and a + on the right.

  • Currently, your slider indicator is pushed all the way to the right (+).

  • Drag that slider handle back to the left (towards the -), or click the Fit to Screen icon next to it (the small square/monitor icon just to the left of the slider).

Once you zoom out, your entire video clip and its corresponding cuts/filler markers will snap back into view. Let me know if this works.


Reply
Posts: 3
(@Audrius)
Joined: 1 week ago

Thanks for a quick response!

But no, it doesn't help, I tried that many times, just made a screenshot forgetting to zoom out.

I can even select the specific time on the slider, but it doesn't make the waveform to appear.
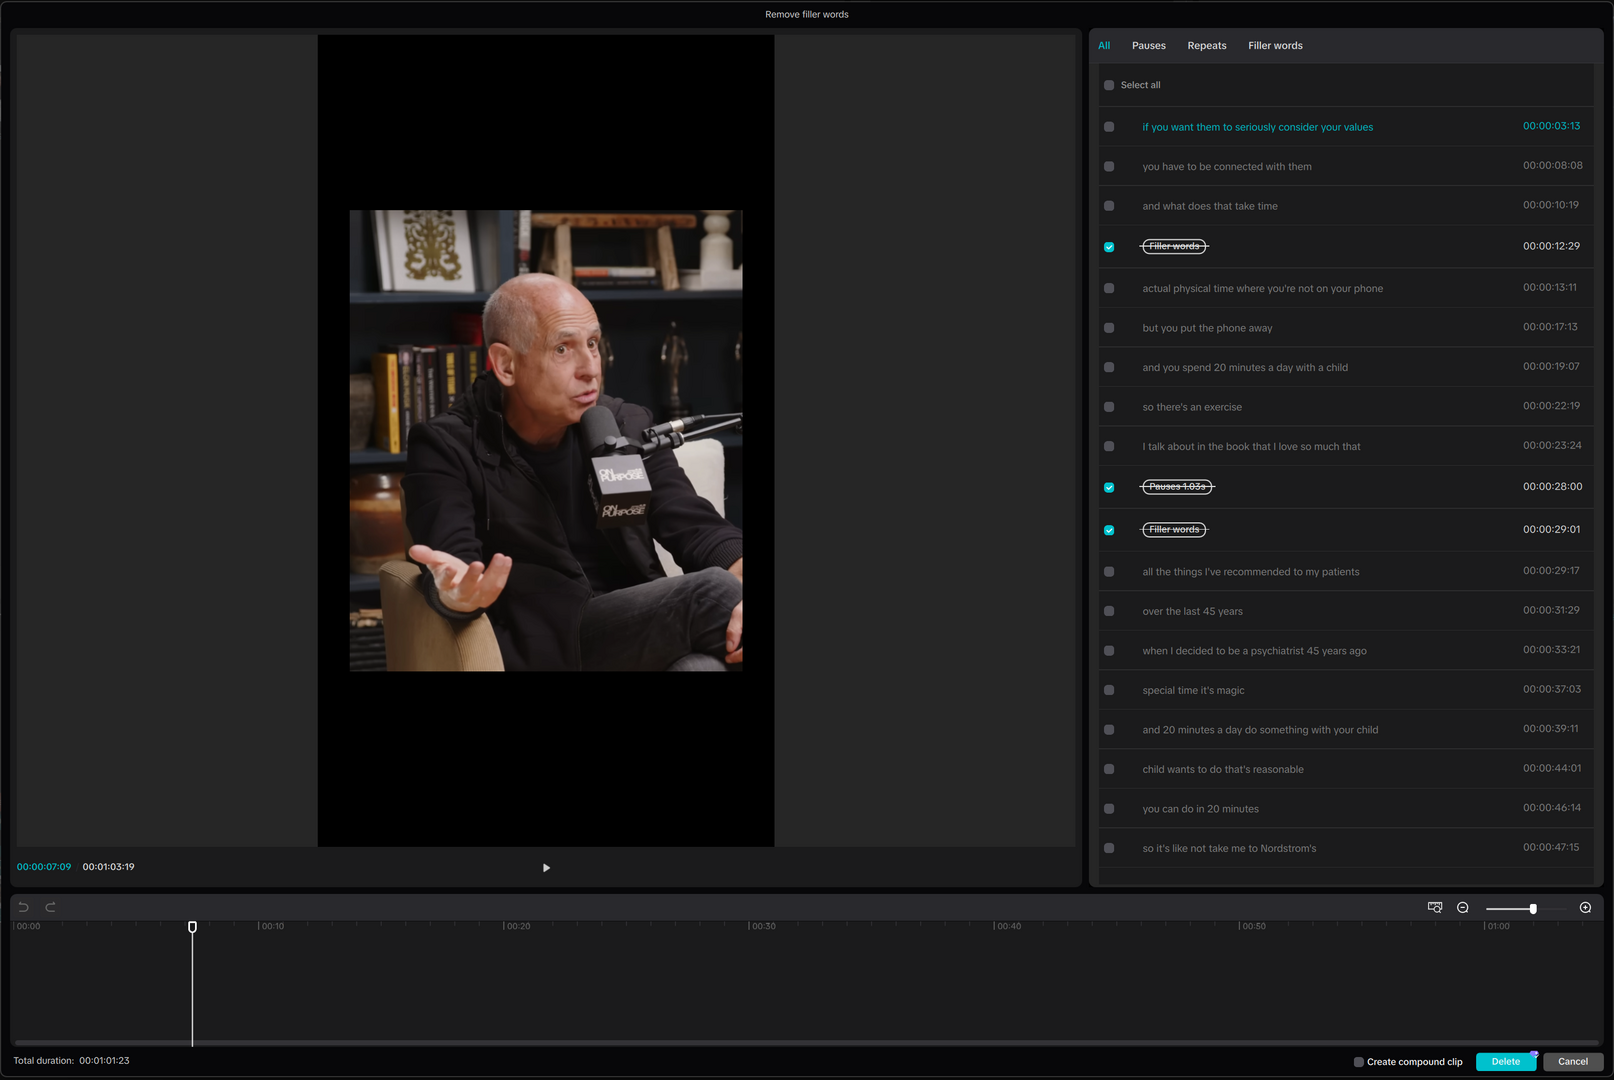
capcut bug3


Reply
3 Replies
CapCut Edit
Admin
(@admin)
Joined: 2 years ago

Member
Posts: 1080

This does not seem to be visual zoom error or a simple UI scaling glitch. mostly CapCut is completely failing to draw or pass the audio data block to that secondary timeline window, even though it can read it well enough to make the text transcript.

Since this problem is happening across two separate computers on version 8.9.1 (even with entirely fresh installations and different media), it is highly likely a core bug introduced in this CapCut build's UI engine, or it's a conflict with the codec/container processing in the "Remove Filler Words" popup window.

Because CapCut auto-updates aggressively, below are the workarounds to force the waveform engine to engage, or roll back to a stable state:

Separate the Audio track first

The transcript window struggles less when it doesn't have to parse a multiplexed video/audio stream concurrently.

  • On your main timeline, right-click your clip and select Separate audio.

  • Once the audio track is sitting independently underneath your video, right-click only the audio track and choose the Transcript-based editing / Remove filler words option.

  • See if isolating the raw audio file forces the UI container to populate the waveform peaks.

The Proxy workflow:

Sometimes CapCut fails to index the sound wave for secondary UIs if the resolution or compression ratio of the raw source clip is heavy.

  • In your main project settings (top right panel under Project), enable Proxy.

  • Set it to performance mode and let CapCut finish generating the proxy file.

  • Once the proxy is active, launch the filler word tool again. The lightweight proxy stream often successfully bypasses whatever rendering deadlock is freezing that timeline track.

Change CapCut's internal rendering API

CapCut uses your Windows graphics layers to render different pop-up windows. If the main interface works but this specific tool window is blank, it's an interface rendering bug.

  • Close your project to return to the home page.

  • Go to Settings (gear icon) > Settings > Performance.

  • Look for Render Engine or GPU interface rendering (depending on the exact sub-version layout). If it is set to DirectX, switch it to OpenGL (or vice versa).

  • Save, fully close CapCut from your system tray, relaunch, and test.

Rolling back to an earlier version

If you subscribed for the smooth workflow using this feature, then version 8.9.1 could be unstable. You can safely downgrade to a version where this layout was completely stable (like a version 8.0.0 or 7.x.x build).

  • CapCut stores its setup installers locally on your computer before updating. Check this path first: C:\Users\<YourUsername>\AppData\Local\CapCut\Apps.

  • You will see folders named after older version numbers. Inside those folders, you can often find the previous version's executable (CapCut.exe) or its original installer file.

  • Running a slightly older version will let you use the Pro features you paid for without the 8.9.1 interface bugs.

Let me know how it goes.


Reply
(@Audrius)
Joined: 1 week ago

Posts: 3

@admin Still nothing

Separating audio track didn't help

Proxy didn't help

Rendering engine change didn't help

Rolling back I couldn't try because the folder you mentioned only has the latest version and I can't find another way to roll back.

Appreciate the support anyway.


Reply
CapCut Edit
Admin
(@admin)
Joined: 2 years ago

Member
Posts: 1080

Since those initial troubleshooting steps did not force the rendering pipeline to draw the waveform, and your AppData folders were already scrubbed of older installers, we need a reliable way to get you back to a stable version where this feature worked.

The safest, cleanest way to download and roll back to an older, official CapCut version on Windows is by using Windows Package Manager (WinGet).

This pulls the official setup files directly from the Microsoft Store/CapCut servers without having to navigate sketchy, ad-ridden third-party download sites.

  1. Backup your projects: While version downgrades usually preserve your local database, back up any highly critical project drafts or export them first just to be completely safe.

  2. Uninstall your current version: Go to your Windows Settings > Apps > Installed Apps, locate CapCut, and uninstall it completely to avoid database version conflicts.

  3. Open Command Prompt or PowerShell:

    • Click your Windows Start menu, type cmd, and select Run as administrator.

  4. View all official oder versions: Type the following command and press Enter:

    winget show ByteDance.CapCut --versions
    

    This will output a list of every official release version of CapCut for PC currently hosted on the repository.

  5. Download the specific older installer: Choose a stable version from a few months ago (e.g., version 8.0.1.3366 or a late 7.x version) and run this download command:

    winget download ByteDance.CapCut --version <VERSION_NUMBER>
    

    (For example: winget download ByteDance.CapCut --version 8.0.1.3366)

  6. Install the Downloaded Version: Once finished, WinGet will output the path to the downloaded .exe installer (usually located in your system's Downloads folder). Open that folder, run the installer, and complete the setup.

Because you recently resubscribed to CapCut Pro:

If you roll back to a version that is too old (e.g., early version 7 or older), CapCut's backend might not recognize your active Pro membership because the older app versions do not support the newer subscription API structures.

If you find your Pro features locked after downgrading, step your version up slightly (e.g., try version 8.2.0 or 8.4.0 instead of going all the way down to a 7.x build).

This should give you the perfect sweet spot: a version that recognizes your Pro license while bypassing the rendering bug present in version 8.9.1.


Reply

Leave a reply

Author Name

Author Email

Title *

or drag and drop it here. Max file size 256MB
Preview 0 Revisions Saved
Share:
Scroll to Top