Learn how to clear cache in CapCut on PC, Android, and iPhone. Fix black preview screens, lag, and export issues in just a few steps. Easy guide for all devices.
If you are a video editor using CapCut, you might notice that over time, the app can start to feel sluggish or behave oddly—like black previews, delayed exports, or crashes. One of the best quick fixes is to clear the cache. This helps remove temporary files that may be causing issues, without deleting your projects.
In this post, we’ll walk you through how to clear cache in CapCut on both PC (Windows) and mobile (iOS & Android).
- What is Cache in CapCut?
- How to Clear Cache in CapCut (PC Version)
- How to Clear Cache in CapCut (Mobile Version)
- When should you clear CapCut’s Cache?
- Final tip:
- How to fix Black Screen in CapCut (Preview or Export)
What is Cache in CapCut?
Cache files are temporary data stored by CapCut to help it run faster. This includes things like:
- Thumbnails of clips
- Temporary render files
- Media previews
Over time, this cache can pile up or get corrupted, causing problems in the app.
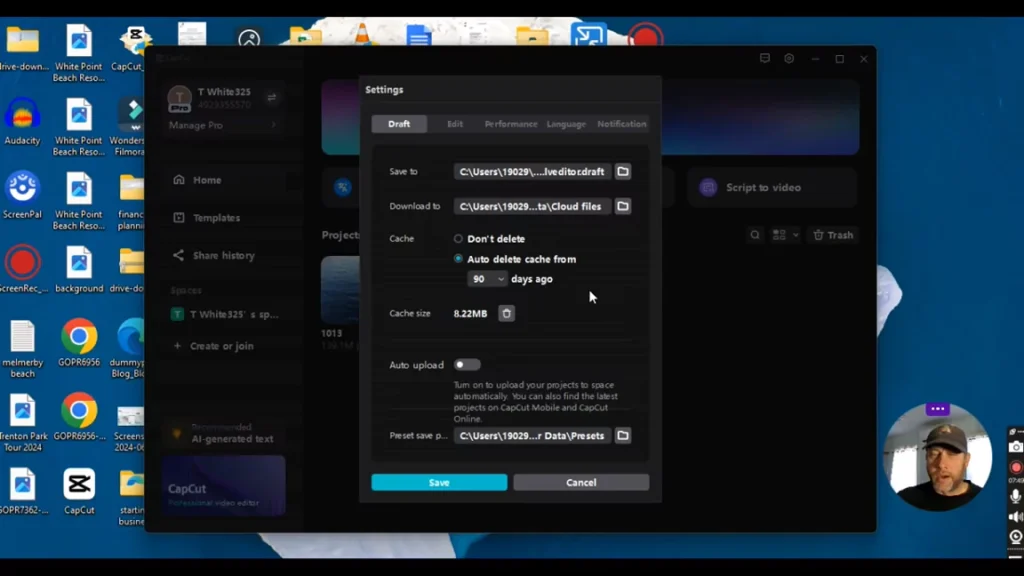
How to Clear Cache in CapCut (PC Version)
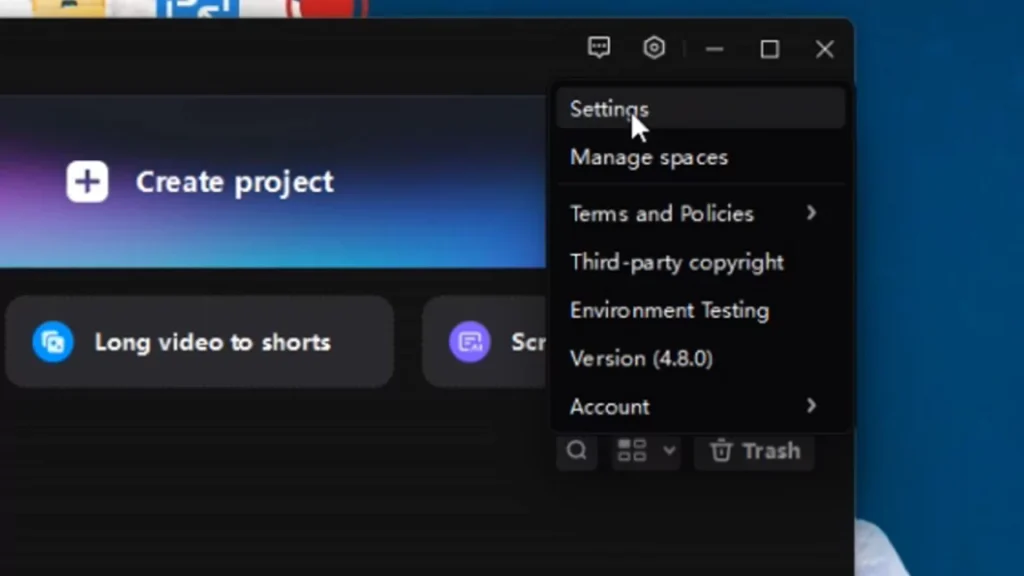
- Open CapCut on your computer.
- Click on the Settings icon (⚙️) in the top-right corner.
- Choose Settings from the dropdown.
- Under the General tab, look for a section called “Cache”.
- Click on “Clear” or “Clear Cache”.
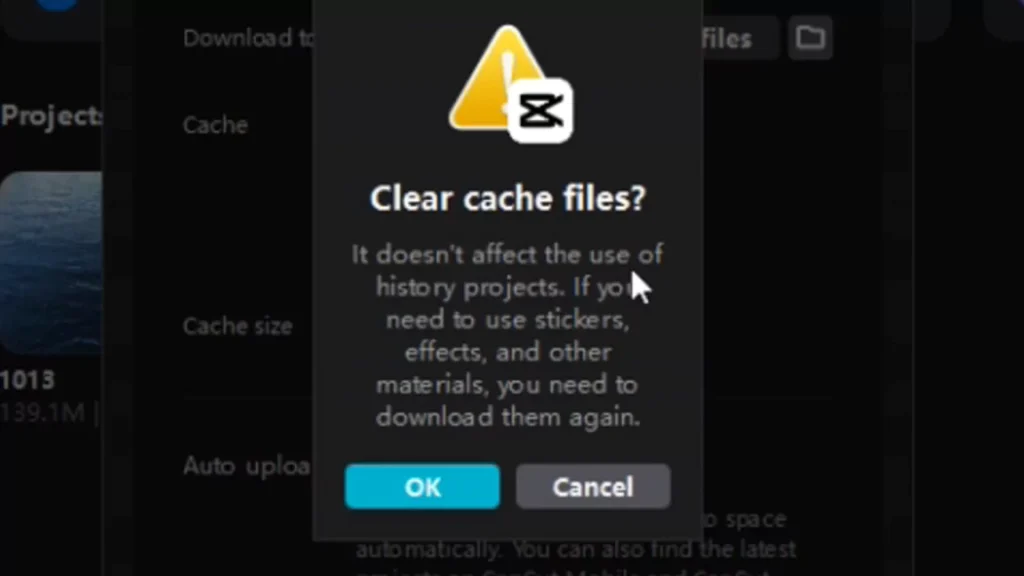
Done! CapCut will remove temporary files but your projects and assets will remain safe.
Watch the video guide of the same here:

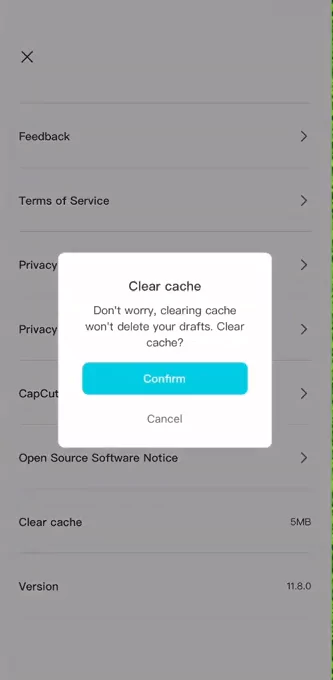
How to Clear Cache in CapCut (Mobile Version)
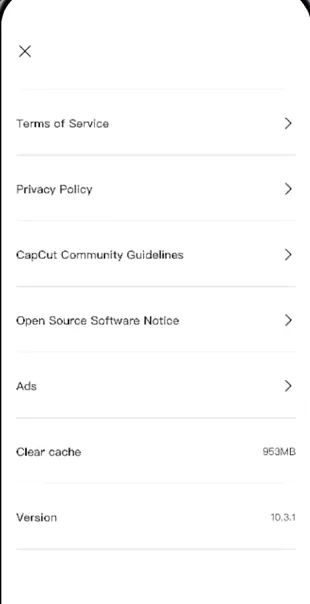
On Android:
- Open CapCut.
- Tap on your profile icon (bottom-right).
- Tap the gear icon (top-right) to open Settings.
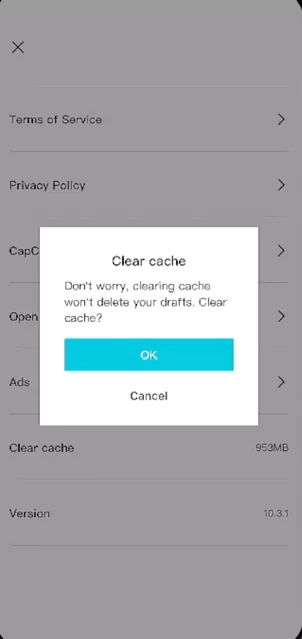
- Scroll down and tap “Clear cache”.
- Confirm when prompted.
On iPhone (iOS):
Unfortunately, iOS does not allow direct cache clearing from within the app. But you can try:
- Deleting and reinstalling CapCut, which clears the cache (don’t forget to back up projects to the cloud).
- Or using iPhone Storage Settings:
- Go to Settings > General > iPhone Storage.
- Find CapCut and check if there’s an option to Offload App (this clears cache but keeps data).
Watch the video guide of the same here:

When should you clear CapCut’s Cache?
- CapCut starts crashing or freezing
- Projects won’t preview or render properly
- You’re low on storage
- You notice strange behavior after importing clips
Important notes
- Clearing cache does NOT delete your saved projects.
- Always double-check that your important files are saved or backed up—especially on mobile.
Final tip:
If clearing the cache doesn’t fix your issue, try restarting your device or reinstalling CapCut completely. Just make sure you’re logged into your CapCut account first so you don’t lose your Pro features or cloud projects.
How to fix Black Screen in CapCut (Preview or Export)
Is CapCut suddenly showing a black screen when you preview or export a project? Don’t panic—this is a common issue among video editors, especially when working with larger files or older devices. In this guide, we’ll walk you through how to fix the black screen problem in CapCut on both PC and mobile (Android & iOS).
1. Clear Cache (first step always)
Sometimes the cache becomes corrupted, causing preview and export issues.
On PC:
- Open CapCut.
- Click the gear icon (top-right).
- Go to Settings > General.
- Click Clear Cache.
On Mobile:
- Android: Profile → Gear Icon → Clear Cache
- iPhone: Use Offload App from iPhone Storage or reinstall CapCut after backing up projects.
2. Disable hardware acceleration (PC Only)
This setting can conflict with certain GPUs and cause the preview window to go black.
- Go to Settings in CapCut.
- Find and disable Hardware Acceleration.
- Restart CapCut.
3. Update your graphics drivers (PC)
Outdated GPU drivers can cause rendering and playback issues.
After updating, reboot your PC and recheck your CapCut project.
4. Check your video file format
Problematic clips (like high frame-rate or odd codecs) may not preview correctly.
- Convert the video to MP4 (H.264) using a tool like HandBrake.
- Avoid clips recorded at more than 60fps.
5. Check your timeline for overlays
Sometimes a black image, broken overlay, or missing media is covering your video.
- Zoom into your timeline.
- Look for any image, effect, or overlay layers above your main video.
- Toggle visibility or delete them one by one.
6. Reset or Reinstall CapCut
If nothing else works, a clean reinstall may help.
On PC:
- Uninstall CapCut.
- Delete these folders:
C:\Users\YourName\AppData\Local\CapCutC:\Users\YourName\AppData\Roaming\CapCut - Reinstall from capcut.com.
On Mobile:
Uninstall and reinstall the app. Ensure cloud backup is enabled to avoid losing projects.

Try proxy mode for large projects
If you’re working with high-resolution footage, enabling proxy mode can help prevent playback and export issues.
Final Thoughts
The black screen problem in CapCut is usually fixable by clearing the cache, checking settings, or updating software. If none of the above works, try starting a new project and importing your clips again—it could be a project-specific glitch.
Still Having Trouble?
Leave a comment below or explore our other CapCut tutorials. Need help recovering a blocked project or syncing Pro features? Check our full troubleshooting series.