Hi,
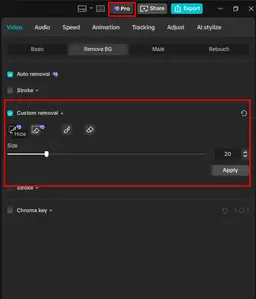
In the screenshot, we can see the “Custom removal” section in the Remove BG tab of CapCut Pro, and you are saying that only the “Size” slider appears, while other options (like brush, erase, restore, or region tools) are missing or grayed out.
Here is a complete breakdown of why this happens and how to fix it
-
CapCut PC Bug (Post-Update Glitch)
-
A recent CapCut update (particularly v3.3.x and later) has a known issue where the Custom Removal tools don’t fully load or remain hidden especially when the AI Auto Removal hasn’t processed properly yet.
-
-
Unsupported Layer Type
-
The Custom Removal tools only work on photo/video layers that have already had Auto BG Removal applied successfully.
-
If you’re using:
-
A transparent PNG,
-
A video with no clear subject, or
-
An image with an alpha channel,
— the “brush” tools won’t show.
-
-
-
GPU Acceleration/Hardware Conflict
-
On some systems, CapCut’s AI toolkits (like BG Removal and Retouch) don’t load fully if hardware acceleration or GPU decoding is disabled in CapCut settings.
-
-
Pro License Sync Issue
-
Sometimes CapCut Pro’s AI features fail to unlock even though your subscription is active. This can happen if you recently switched devices or logged out.
-
Fix steps to implement:
1. Reapply Auto Removal
-
Go to Video → Remove BG → Auto removal
-
Wait until it fully processes (you’ll see the background disappear).
-
Then enable Custom Removal — the brush and erase icons should appear.
2. Try on a Different Clip Type
-
Import a standard JPG or MP4 file (not a transparent PNG).
-
Apply Auto Removal first.
-
Then check if Custom Removal tools appear.
3. Enable Hardware Acceleration
-
Click Settings (⚙️) → Performance
-
Turn ON:
-
Hardware acceleration for video processing
-
GPU acceleration for AI features
-
-
Restart CapCut and test again.
4. Force Pro Sync
-
Log out → log back in to CapCut.
-
Click on your profile icon → Check Subscription.
-
If it shows “Pro Active,” close and reopen CapCut.
-
Try again with internet connected (it needs to verify AI tools online).
5. Reinstall / Clear Cache
If none of the above works:
-
Go to Settings → Storage → Clear Cache.
-
Then reinstall CapCut from the official site (not Microsoft Store), alternatively you can download the file directly on your system from here.
Points to note:
If you need to continue working immediately:
-
You can manually erase or mask using the “Mask” tab (next to “Remove BG”).
Use a shape mask + keyframe animation for controlled background reveal — it’s slower, but works 100% even if AI tools are glitched.
Since you confirmed that only the “Size” slider appears under Custom Removal, here’s the step-by-step illustrated guide to fix it
Step 1: Make Sure Auto Removal Was Applied First
-
Import your photo or video into the timeline.
-
Go to the top toolbar → Video → Remove BG tab.
-
Enable Auto removal and wait until the background disappears.
If you skip this, Custom Removal won’t show all tools — it only activates after the AI background detection runs.
Step 2: Re-enable Custom Removal After Auto Removal
Once Auto Removal finishes:
-
Turn ON Custom removal.
-
You should now see all icons:
-
Brush tool (remove)
-
Restore tool (bring back parts)
-
Eraser / Clear selection
-
Hide/Show toggle
If only “Size” appears → go to Step 3.
-
Step 3: Turn On GPU & AI Acceleration
-
Click Settings (⚙️ icon) → Performance.
-
Turn ON both:
-
Enable GPU acceleration
-
Enable AI features (requires restart)
-
-
Restart CapCut.
-
Reopen your project → try Remove BG → Custom Removal again.
These AI tools depend on GPU drivers — if disabled, they only partially load (that’s why you see “Size” only).
Step 4: Force Pro Verification (Fix AI Lock Glitch)
Sometimes Pro verification doesn’t sync properly.
-
Click your profile picture (top-right corner).
-
Select “Manage Account” → “Check Subscription Status.”
-
If it says CapCut Pro Active, great.
-
If not → log out → log in again with your Pro account.
-
Then restart CapCut and recheck the feature.
-
Step 5: Clear Cache and Restart the App
If steps 1–4 didn’t fix it:
-
Go to Settings → Storage → Clear Cache.
-
Close CapCut completely.
-
Reopen it, and re-import your clip.
-
Try Auto removal → Custom removal again.
Step 6 (Optional Workaround): Use “Mask + Keyframes”
If the bug persists and you urgently need manual control:
-
Go to Video → Mask → Brush (or Shape).
-
Manually “paint” or shape the visible area.
-
Use Keyframes to animate the mask for smooth background adjustments.
This gives full control without relying on Custom Removal.
Step 7 (Last Resort): Reinstall CapCut
If everything fails:
-
Backup your projects from:
-
Uninstall CapCut completely.
-
Reinstall from the official website.
-
Log back in with your Pro account and re-test.
Final Check
After reinstall or restart:
-
Import a standard .jpg image.
-
Apply Auto Removal first.
-
Turn ON Custom Removal.
-
You should now see all four icons + Size slider like this:

