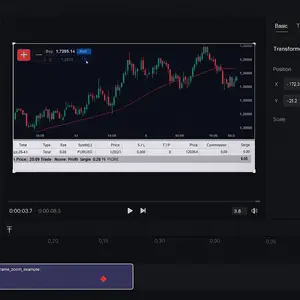
Hi, I'm trying to make something similar to the attached video. I have a recording of myself trading assets, and when I move the graph, it sometimes doesn't appear in the video I'm editing. Using Cap Cut on pc could I move the video to the parts I'm interested in? I saw that it's done with the "keyframe" function, but I can't find it. Thanks.
Hi,
Got it. You are trying to create a video like the one you attached, where the screen (especially the trading graph) shifts around to focus on specific moments and you are right, that is typically done using keyframes to control movement (pan, zoom, etc.) over time.
Here's how to do it in CapCut for PC:
Step 1: Locate the Keyframe Tool
-
Import your video and drag it to the timeline.
-
Select the clip in the timeline.
-
Look above the preview window or in the right-side editing panel — you should see a diamond icon labeled "Add keyframe".
-
If you don't see it, try clicking the “Basic” tab or “Animation” tab when the video clip is selected.
-
Step 2: Add Keyframes to Focus on Graph Areas
-
Move the playhead (the timeline scrubber) to the start of the part you want to zoom or move.
-
Add a keyframe.
-
Adjust the position and scale of the video in the preview window (zoom in, move the frame to the left/right).
-
Move the playhead to a later moment and adjust the frame again — another keyframe will automatically be created.
-
CapCut will animate the transition between the keyframes.
Zoom into Graph
-
Start zoomed out (normal view).
-
Add a keyframe.
-
Move forward a few seconds, zoom in and reposition to focus on the graph.
-
Another keyframe will appear — now it zooms smoothly into the graph.
If you're not seeing the changes in the exported video, make sure the effect/animation is inside the export range.
To fine-tune, use the “Transform” settings (Position X/Y, Scale) on the right.
Here Is a step-by-step guide to recreate that zoom and pan effect in CapCut on PC using keyframes:
1. Import Your Video
-
Open CapCut on your PC.
-
Click “+ New Project”.
-
Import your trading video and drag it to the timeline.
2. Add the First Keyframe (Normal View)
-
Click the video clip in the timeline to select it.
-
Move the playhead (white line) to where you want the zoom effect to begin.
-
In the top right panel, click the diamond icon labeled "Add Keyframe" (you’ll see a red diamond appear on the clip).
-
Don’t change anything yet — this marks the starting view.
3. Zoom & Move (Second Keyframe)
-
Move the playhead a few seconds ahead.
-
In the preview window, click on the video and use the corners to scale up (zoom in).
-
Then drag the video around to focus on the graph or trade you want to highlight.
-
A new keyframe is added automatically after you make these changes.
Now, CapCut will animate from full view to the zoomed-in section.
4. Return to Normal
-
Move the playhead a few seconds further.
-
Add another keyframe and reset the zoom (scale back down and recenter).
-
This makes the video zoom back out smoothly.
-
You can view and adjust all keyframes by selecting the clip and watching the diamonds on the timeline.
-
Use “Transform” panel on the right for precise control of:
-
Scale = zoom level
-
Position X/Y = where the frame is centered
-

