Notifications
Clear all
Video Editing Tips
2
Posts
2
Users
0
Reactions
1,446
Views
1 Reply
May 04, 2025 3:02 pm
Hi,
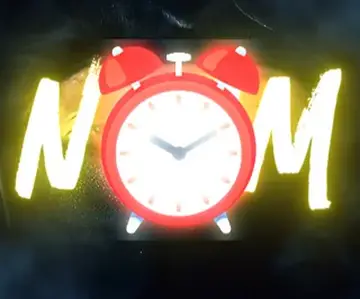
Thanks for the clear explanation and image. The glowing "square" around the clock emoji appears because the emoji you imported has a transparent background that doesn’t fully support HDR effects like glow (such as in HDR2). CapCut applies effects like HDR2 only within the bounding box (invisible but present) of the image, not beyond its alpha (transparent) edges. That creates the boxed glow you're seeing.
Here's how to fix it:
- Option 1: Remove the hard edges with a blend or feather
- Select the emoji/image in the timeline.
- Apply a mask (like circle or heart) and feather it heavily. This can soften or eliminate the visible square edges.
- Adjust the size and feather strength until the glow transitions smoothly into the background.
- Option 2: Use “Blend Mode” instead of HDR
- Remove the HDR2 effect.
- Add a duplicate of the emoji on a layer behind it.
- Apply a Glow filter manually (use brightness + blur + blend mode like "Add" or "Overlay") on that duplicate to create a more natural, edge-free glow.
- Blur the duplicate image slightly and lower its opacity to blend it better.
- Option 3: Use pre-glowed emojis or custom renders
- Instead of applying HDR2, you could:
- Download a version of the emoji already with a glow or glow border added (e.g., from a PNG editing site like Pixlr or Photopea).
- Or create a custom version yourself with the glow pre-rendered in an image editor.
- Option 4: Crop the image to the visible area
- If the transparent edges are too wide:
- Use CapCut's Crop tool to trim the transparent area around the emoji.
- Then reapply HDR2 — the bounding box becomes smaller and fits closer to the actual content, making the glow look more natural.
Other tips:
- Find Emojis with True Transparent Backgrounds: The key is to get emoji images that are saved as PNGs where the transparency truly defines the shape of the emoji, not just a transparent background within a square box. When searching on Google, try adding terms like "PNG transparent background" or look for sites specifically offering free PNGs. Be cautious of sites that show a checkerboard pattern on the preview but then download a JPG with a solid background. You need to ensure the downloaded file is a genuine PNG with alpha channel transparency.
- Use CapCut's Built-in Stickers/Emojis: CapCut has a library of stickers and emojis within the app itself. These are usually optimized to work correctly within the editor and are less likely to have these boundary issues. Explore the "Stickers" or "Text" (and then "Emojis" if available) options within CapCut to see if the emojis you need are there.
- Edit the Image Before Importing: If you have access to an image editor (like Photoshop, GIMP, Photopea.com online, etc.), you can open the emoji image, ensure it's cropped tightly around the emoji itself, and then save it as a PNG with transparency enabled. This removes the hidden square canvas.
- Check the File Type: Make sure the file you downloaded is actually a
.pngfile. Other formats like.jpgdo not support true transparency and will always have a solid background, even if it appears white or black.
The most effective solution will be to use an emoji image that has proper, tight transparency around the graphic itself. Once you import such an image into CapCut, the HDR2 effect should apply only to the visible part of the emoji, without the square boundary.

