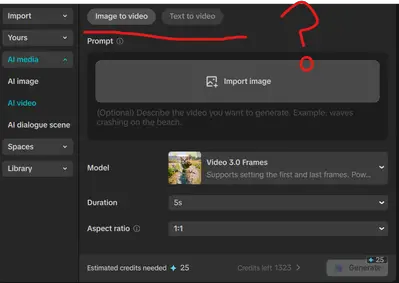
Hi,
CapCut’s AI Media → AI Video tab only shows Image to Video (with a single image) and Text to Video, but not the “image-to-video with multiple images” option that used to exist.
Here’s what’s going on:
-
CapCut has recently been rolling out updates that unify and simplify AI video generation. In some regions and versions, they removed the option to upload two images (start + end frame) and replaced it with the “Video 3.0 Frames” model, which generates motion from a single image instead.
-
The old dual-image mode was experimental, and CapCut seems to be limiting or retiring it in favor of single-image + text prompt control.
-
Some users still see the 2-image input option, but only in older app versions or certain regions. If your app updated recently, that’s why you don’t see it anymore.
What you can do now:
-
Check for Beta/Alternate Models
-
Sometimes CapCut hides extra options under different models. In your “Model” dropdown (currently showing Video 3.0 Frames), check if there’s a “2 Frames” or “Image Sequence” option.
-
-
Use Keyframes as a Workaround
-
If you need a video morphing from one image to another, you can import both images into the timeline and use zoom + dissolve + blur keyframes to simulate smooth transitions.
-
-
Try Older Versions or PC/Mobile
-
The 2-image feature may still exist in a previous CapCut build (APK or older PC release). If you really need it, you can try installing an older version.
-
-
Alternative Tools
-
Runway Gen-2, Pika Labs, or Kaiber AI still allow multiple image → video morphing with more flexibility.
-
Below is a step-by-step workaround inside CapCut to recreate the 2-image-to-video effect manually (using transitions and keyframes):
Option 1: Recreate “Image → Video (2 images)” manually inside CapCut
You can simulate the effect with keyframes + transitions:
-
Import both images into your CapCut timeline.
-
Set image duration (e.g. 3–5s each).
-
Apply zoom & pan with keyframes:
-
On the first image, set a starting keyframe (normal size).
-
At the end, add another keyframe (slightly zoomed or shifted).
-
This creates motion in the still image.
-
-
Add transition to second image:
-
Use Cross Dissolve or Fade for a smooth blend.
-
Or try Morph Transition (if available) for a fluid change.
-
-
Add motion to 2nd image with keyframes too (e.g. zooming out or sliding sideways).
-
Add blur or camera shake during the transition for more realism.
This recreates the "first → last frame" effect the old AI tool had.
Option 2: Get back the old “Image to Video (2 frames)” feature
If you really want the AI version:
-
Check the Model dropdown in your screenshot → sometimes CapCut hides “Video 2.0 Frames” or “Image Sequence” there.
-
If not available, you’ll need an older CapCut version (APK for mobile or older PC release). The feature was removed in recent updates.

