While working in CapCut Desktop (version 7.3.0) on my laptop, I use only 4K video material.
Even though the source files are sharp, the exported video appears blurry and lacks detail, even when exporting in 4K resolution with the highest quality settings.
The image quality is also low during editing, even when proxy is disabled.
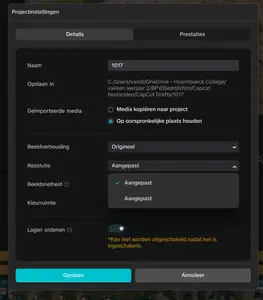
When checking the project settings, I noticed that the resolution under the “Details” tab is set to “Custom”, and it cannot be changed — the only available option is again “Custom.”
Hi,
You are running into a known issue in CapCut Desktop version 7.3.0 that causes 4K video projects to appear blurry both in preview and export, even if:
-
You are using 4K source footage
-
Proxies are disabled
-
Export settings are set to “4K Highest Quality”
The Root cause
In CapCut 7.3.0 (and 7.2.x), a bug in the project settings dialog causes:
-
The project resolution to default to “Custom” instead of the source or desired export resolution.
-
The render pipeline to downscale playback and export internally, even though export settings show “4K.”
This makes the entire video look soft or pixelated — both in the preview and the final render.
Step-by-Step Fixes
Option 1: Manually Reset Resolution via New Project
-
Create a new project.
-
Before importing media, go to Project Settings → Resolution.
-
You will likely still see “Custom” — that’s the bug.
-
Import one of your 4K clips first.
-
Then reopen Project Settings → the resolution should now show “3840×2160” (4K).
-
If it still says “Custom,” click the dropdown and reselect the “Original” aspect ratio. Sometimes that reinitializes the resolution.
-
Now reimport the rest of your clips and continue editing.
Option 2: Force 4K Output on Export
-
Go to Export → Advanced Settings.
-
Set:
-
Resolution: 3840×2160
-
Bitrate: High (or manually set around 50–80 Mbps for 4K)
-
Frame Rate: Match your footage (usually 25/30/60 fps)
-
-
Disable Hardware Acceleration (sometimes causes render scaling bugs).
-
Export again — this often restores the sharpness.
Option 3: Clear Cache & Disable Proxies
Even if “proxy” is off in settings, CapCut sometimes caches lower-quality preview files.
-
Go to Settings → Cache → “Delete Cache Files.”
-
Ensure Proxy Editing is off.
-
Restart CapCut and reopen the project.
Option 4: Update or Roll Back
-
Check if a new version is available and update the same (CapCut is fixing this issue in current releases).
-
If not, roll back to version 7.1.0 or 7.0.0, which had stable 4K editing and exports.
Checking the Real Resolution
To confirm CapCut is actually processing in 4K:
-
After export, open the file in VLC → Tools → Codec Information.
-
Check the “Decoded Resolution.”
-
If it says 1920×1080, CapCut downscaled it.
-
If it says 3840×2160, export is correctly 4K (blur is likely compression or preview scaling).
-
Below is the optimal export configuration for CapCut Desktop especially for 4K projects using high-quality source footage.
Below are two sets of settings — one for YouTube/content uploads and another for professional/cinematic projects (like presentations or corporate films).
1. BEST EXPORT SETTINGS FOR YOUTUBE / ONLINE VIDEOS
Export Settings (CapCut → Export → Advanced Settings):
| Setting | Recommended Value | Notes |
|---|---|---|
| Resolution | 3840 × 2160 (4K UHD) |
Never “Custom” — always manually choose this if available. |
| Frame Rate (FPS) | Match your source (usually 25 / 30 / 60) | Example: 25 fps for cinematic, 60 fps for gaming or vlogs. |
| Bitrate | 45 – 80 Mbps |
Higher = more detail. Use ~60 Mbps for 4K YouTube. |
| Codec / Format | H.264 (MP4) |
Widely compatible and efficient. |
| Hardware Acceleration | OFF (if exports are soft or glitchy) | Prevents downscaling/render bugs in 7.3.0. |
| Color Space | Default (Rec.709) | Avoid custom unless your footage is log. |
| Audio | 48 kHz, 320 kbps | Keeps sound crisp. |
After export, upload to YouTube as is — YouTube will re-encode, but starting with a 4K 60 Mbps file ensures minimal compression.
2. BEST EXPORT SETTINGS FOR PROFESSIONAL / CINEMATIC PROJECTS
| Setting | Recommended Value | Notes |
|---|---|---|
| Resolution | 3840 × 2160 (4K UHD) | Or 4096 × 2160 for DCI 4K workflows. |
| Frame Rate | Native of source (often 25 fps or 24 fps) | Keeps natural motion. |
| Bitrate | 80 – 120 Mbps (VBR preferred) |
Maximizes clarity, especially for nature or detailed shots. |
| Codec | H.265 (HEVC) if available |
Better compression efficiency and sharper gradients. |
| Color Space | Rec.709 (standard) or DCI-P3 if your monitor supports it | Prevents washed-out colors. |
| Audio | 48 kHz, 24-bit | Studio-grade. |
| Render Engine | CPU rendering (if GPU causes blurring) | More consistent color fidelity. |
For cinematic 4K exports, you can even go higher (up to 150 Mbps) for grading or large-screen display.
If “Resolution” still shows as “Custom”
In CapCut Desktop 7.3.0:
-
Start a new project.
-
Drag in a 4K clip first.
-
Go to Project Settings → Aspect Ratio: Original.
CapCut usually detects the clip’s native 4K resolution at this point. -
Then go to Export → Advanced Settings and manually override to 4K if still needed.
Quality verification after export
After exporting:
-
Open your video in VLC → Tools → Codec Information.
-
Look for:
-
Decoded resolution: 3840 × 2160
-
Bit rate: ~60 000–100 000 kb/s
-
Codec: H.264 or H.265
-
If these match — your export is a true 4K high-bitrate file.


