Bug with transition...
 
Notifications
Clear all

Bug with transitions

6 Posts
3 Users
0 Reactions
2,298 Views
Avatar of loev265
Posts: 2
Topic starter
(@loev265)
New Member
Joined: 7 months ago


Hi! There is a bug with transitions to the Cap Cut. That is, the Cube transition does not take the next footage for a smooth transition, but at the beginning of the same video, at the moment with Spongebob, the transition works.

But if I delete the transition and put it back on, then it breaks too. This error occurs with all transitions that should overlap each other.

I wrote to tech support, but a month later they still haven't responded. I didn't find any information with a similar bug on the Internet either. Please any help.


5 Replies
CapCut Edit
Posts: 831
Admin
(@admin)
Member
Joined: 2 years ago

Hi,

Thanks for sharing the video — we watched the clip, and we see exactly what you are describing. The Cube transition is supposed to take the next clip and create a 3D-like rotation between them. But in most parts of your project, it's grabbing the start of the same clip instead of transitioning to the following one — except at the moment with Spongebob, where it works as expected.

This seems to be a layering or rendering issue in CapCut, especially with transitions that depend on both clips (like Cube, Page Turn, etc.). A few things you can try to fix or work around it:

  1. Fix Attempt 1: Check Track Placement
    • Make sure both clips are on the same track with no gaps or overlaps. Sometimes if one clip is slightly shifted or on a different layer, transitions won’t read it properly.
  2. Fix Attempt 2: Cut off a frame from the end
    • Trim 1 frame off the end of the first clip and 1 frame from the start of the second clip. CapCut may be misreading the clip boundary.
  3. Workaround Option
    • If the transition only works once (like with the Spongebob part), here is a trick:

      • Apply the working transition where it functions correctly.

      • Export just that portion (you can make a temporary project).

      • Re-import the exported video.

      • Place it into your main timeline as a clip with the transition “baked in.”

      Repeat for any others where the transition breaks.

  4. Manual Transition Effect: If the overlapping transitions are consistently failing, you could try to create a manual "cube" or overlapping effect using keyframes and transformations. This would be more time-consuming, but it might give you the desired visual result. For example, you could scale down one clip and scale up the next while rotating them to mimic a cube effect.
  5. Use a Different Transition: While not ideal, consider using a different transition that doesn't rely on overlapping footage for the time being.
  6. Split and Layer: For some overlapping effects, you might be able to split your clips and place them on different video layers in the timeline. Then, you can animate their opacity or position to create a transition effect.

You can manually recreate the Cube transition using keyframes in CapCut Pro. This method simulates the 3D cube rotation even when the built-in transition is broken.

  • Make it look like the first clip rotates out like a cube face, and the second clip rotates in to replace it — smooth and seamless.

STEP 1: Stack the Clips

  • Drag both clips onto the main timeline.

  • Place the second clip above the first one in the overlay track, starting slightly before the end of the first one (e.g., 15–20 frames).

    • You can zoom into the timeline for precision.

STEP 2: Add Keyframes to Clip 1 (Out)

  • Select Clip 1 (on the main track).

  • Move the playhead to the start of the transition zone (where the second clip begins).

  • Add a keyframe for:

    • Rotation Y

    • Scale100%

  • Move the playhead to the end of the transition zone.

  • Add a second keyframe:

    • Rotation Y90° (rotate out to the right)

    • Scale80% (optional slight zoom out for depth)

STEP 3: Add Keyframes to Clip 2 (In)

  • Select Clip 2 (on the overlay track).

  • Move to the start of its transition zone.

  • Add a keyframe:

    • Rotation Y-90° (starting out turned)

    • Scale80%

  • Move to the end of the transition zone.

  • Add another keyframe:

    • Rotation Y

    • Scale100%

STEP 4: Add a Shadow or Motion Blur

  • Use a black shape or effect to simulate a shadow on rotation.

  • Add motion blur if you have that option enabled in CapCut Pro settings.

Press play and check if the clip now rotates out as the new one rotates in — like a proper cube effect.


Reply
2 Replies
Avatar of loev265
(@loev265)
Joined: 7 months ago

New Member
Posts: 2

@admin None of this helped, but I realized that the error is that CapCut does not create duplicate frames for transitions


Reply
CapCut Edit
Admin
(@admin)
Joined: 2 years ago

Member
Posts: 831

@loev265 Yes, that might break transitions like Cube, Page Turn, Flip, etc., because they require duplicated frames to blend from one clip to another. 

CapCut’s transition engine needs both the last few frames of Clip 1 and the first few frames of Clip 2 to blend them — but it doesn’t generate temporary duplicated frames to simulate overlap. If the clips are butted directly against each other with no headroom or tails, CapCut can’t “look ahead” or “look behind,” so transitions glitch out or pull from weird parts of the video (like the start of the same clip).

Add Overlapping Frame Buffers:

Method: Manual Overlap

  1. Trim Clip 1 back by about 10 frames.

  2. Trim Clip 2 forward by the same amount.

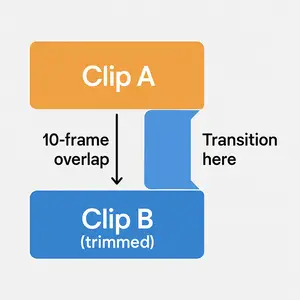
  3. Drag both into the timeline with a 10-frame overlap.

  4. Apply the Cube transition at the overlap.

  5. CapCut now has something to blend between — and Cube will work correctly.

If trimming isn’t an option (like you need all footage), here’s a trick:

  • Duplicate the last 10 frames of Clip 1, and place them before Clip 2.

  • Apply the transition on the duplicated tail → Clip 2.

  • Export the transition section, then splice it into the timeline.

We will show a technique to build a reusable CapCut transition template that ensures smooth results for transitions like Cube, Page Turn, Ripple, and any others that require overlapping frames.

Goal: Avoid glitchy or broken transitions by always giving CapCut the frame overlap it needs.

  • Template Setup (One-Time):
    • Create a new CapCut project.
    • Add two placeholder clips:
      • Clip A (3–5 sec of stock footage)
      • Clip B (3–5 sec of different stock footage)
  • Add Overlap for Smooth Transitions:
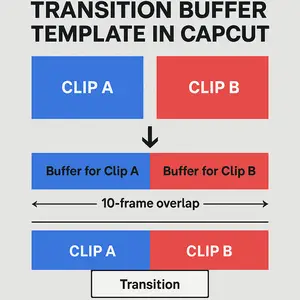
    • Trim Clip A so it ends 10 frames early.
    • Trim Clip B so it starts 10 frames late.
    • Then, drag Clip B leftward to create a 10-frame overlap with Clip A.
    • Now they overlap exactly 10 frames — CapCut can blend them!
  • Apply Transitions:
    • Click between the overlapping clips.
    • Add a transition like Cube, Page Turn, or any 3D one.
    • Test to make sure it flows smoothly.
  • Save as a Template:
    • Keep both placeholder clips in the timeline.
    • Save this project as:
    • “Transition Buffer Template.capcut”
    • Duplicate it for any future edits!
  • Using the Template:
    • When you're ready to use it:
      • Open the saved template.
      • Replace the placeholders with your real footage using “Replace” or by dragging new clips into the timeline.
      • Adjust timing if needed — just keep that 10-frame overlap!
      • Done! Smooth transitions guaranteed.
  • Make Versions for Different Durations:
    • You could also make:
      • One template with a 10-frame overlap
      • One with 15 frames
      • One with 30 frames (for slower transitions like Ripple or Morph)
1911763a 3511 4002 b120 c509fe7c8c8e

You can use these dummy transition clips:

Clip A:

Clip B:

How to Use in CapCut:

  • Import both clips into your project.
  • Trim:
    • Clip A: trim 10 frames off the end
    • Clip B: trim 10 frames off the start
  • Overlap them by 10 frames on the timeline.
  • Add your desired transition (like Cube) between them.
  • Replace with your real footage later — or use this as your permanent layout reference.

Please see below image to create transition buffer template in CapCut:

Visual Guide on Transition Buffer template in CapCut

Reply
151f65e36edcd4c61edb959de19d7c264731a2b48d26e01269a3442e3e21b2ce?s=80&r=g
Posts: 1
(@Denis)
Joined: 2 weeks ago

None of the fixes work, i want to make this transition between 2 photos but i cant its the same result as the video mention above. Capcut has a ton of glitches for me its getting less and less fun



Reply
1 Reply
CapCut Edit
Admin
(@admin)
Joined: 2 years ago

Member
Posts: 831

CapCut’s transition system has a few deep bugs, especially when working with static images instead of video footage. The issue you are hitting where the transition pulls from the start of the same clip instead of the next is one of the worst ones, and unfortunately it’s been reported by many users since mid-2024, still unresolved in 2025.

Let us go over what’s happening and how you can still get a clean Cube-style photo transition despite CapCut’s glitch.

CapCut treats photos as “non-continuous media” meaning it doesn’t generate in/out frame buffers like it does for videos.

So:

  • 3D transitions (Cube, Page Turn, Fold, Flip) look for “next clip” data.

  • When the next clip is a photo, CapCut sometimes doesn’t “see” it.

  • Instead, it duplicates the first frame of the current clip → causing that same “restarting” or “flashback” glitch.

This is why your Cube transition works on one clip (like your SpongeBob example) but breaks on others.

The Workarounds that actually work:

1. Convert each photo into a short video first

This is the most reliable fix.

  1. Import your photos into CapCut.

  2. For each one:

    • Add a small zoom-in or pan with keyframes.

    • Export it as a short video (2–3 seconds).

  3. Start a new project and use these exports instead of raw photos.

  4. Now add your Cube or 3D transition it will work perfectly.

This works because you have tricked CapCut into treating your photos as video clips, so it correctly generates the frame buffers for transitions.

2. Manually recreate the Cube Transition with photo version

If you don’t want to export mini videos, do this:

  1. Put Photo A on the main track.

  2. Put Photo B as an overlay, starting ~10 frames before Photo A ends.

  3. Animate both with keyframes:

    • Photo A → Rotate Y from 0° → 90°, Scale 100% → 80%.

    • Photo B → Rotate Y from -90° → 0°, Scale 80% → 100%.

  4. Add a slight motion blur or ease in/out for realism.

  5. Result: a manual Cube-style transition that works every time, even between images.

3. Use a transition preset from a template if you want quick results

Try searching in CapCut’s Templates section:

  • “3D Cube Transition”

  • “Flip Transition between photos”

  • These prebuilt templates use overlays or keyframes under the hood avoiding the bug entirely.

What’s going on behind the scenes?

The glitch comes from a rendering bug where CapCut doesn’t duplicate image frames into its internal transition buffer.
It is not your device and it is the app’s render engine mismatch between videos and stills.

If CapCut is starting to kill the fun, you could:

  • Try VN Editor or DaVinci Resolve Free both handle image transitions properly.

  • Or stick with CapCut but create your own small motion templates (so you can just drag and reuse without re-keyframing every time).


Reply

Leave a reply

Author Name

Author Email

Title *

The advanced attachments is disabled for guests
Preview 0 Revisions Saved
Share:
Scroll to Top